This tutorial is a personal creation from Valérie Savary, better known as
valyscrappassion.com. You can find the original here.
Any resemblance with another one would be only pure coincidence.
It is strictly forbidden to modify tubes, to change their name or take off the
watermarks, to present them on your sites or blog, to share them in groups, to make a bank of images or to use them on lucrative purposes.
Thank you to respect Valérie’s work and other creators' work mentioned in the original tutorial. Don’t hesitate to warn me if you have any trouble with this translation and I’ll try to fix the problem as quickly as I can. You can reach me here.
This tutorial was made on March 13, 2015, with an earlier PSP version. I have used PSPX to make my translation; you can follow this tutorial with any other versions of PSP, but the result might be slightly different.

Download the zip file containing the materials, decompress and copy the originals; work with the copies. For presets, double-click on them and they will install themselves. For gradients, masks, selections, textures, etc, simply place in 'My PSP files' under their appropriate folders.
Plugins
AAA Frames
Alien skin Eye Candy 5 Impact
Toadies
Unlimited Filters 2.0 - &<Bkg Designer sf10I>
Unlimited Filters 2.0 - &<Bkg Kaleidoscope>
Colors
Foreground color #deb853
Background color #484e20
Additional color #c4b6ac
Additional color #ffffff
Preparation
Open the Narah mask and minimize for further use.
Prepare a Sunburst gradient with 0 Repeats, invert
unchecked
Centre H 0 and V 35
Source H 50 and V 50
Liaison unchecked
1
Open your duplicate of the file 'Alpha-Maryse_VSP'
Flood fill with the gradient just created
Layers - New raster layer
Flood fill with your color 2
Layers - New mask layer - From an image and select the
Narah_mask_0722 (which should be minimised in your
workspace)
Layers - Merge - Merge group
2
Selections - Load/Save Selection from your alpha channel and select Selection
#1
(Note from the translator: My PSP has difficulties
with french characters as you can see)
Layers - Merge - Merge group
Selections - Promote selection to layer
Flood fill with your Foreground color
Effects - Plugins - Filters Unlimited 2.0 -
&<Bkg Designer sf10I> - 4 way average
Selections - Select none
Effects - Image effects - Offset Hor 0 / Vert -135
Layers - Duplicate
Image - Mirror
Image - Flip
Layers - Merge - Merge down
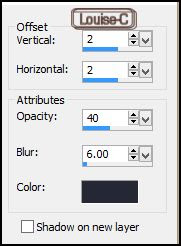
Effects - 3D effects - Drop shadow 0 / 0 / 40 / 25
with color black
Effects - Plugins - Toadies - What are you 40 / 20
Layers - Merge - Merge visible
3
Selections - Load/Save Selection from your alpha channel and select Selection
#2
Selections - Promote to layer
Effects - Texture effects - Tiles with the Foreground color and these
settings:
Selections - Select none
Effects - Plugins - Toadies - What are you 20/20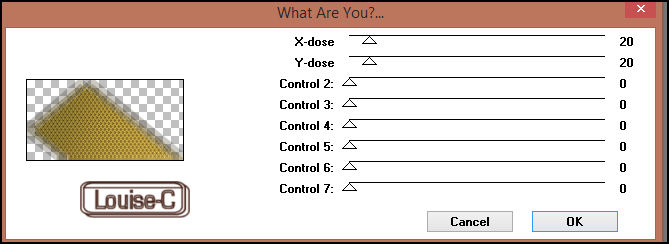
Layers - Merge - Merge visible
4
Effects - Plugins - Filters unlimited 2.0 - &<Bkg Kaleidoscope> - Cake mix
with default settings (a circle will appear in your image)


Effects - 3D effects - Drop Shadow - 10 / 10 / 40 / 25 with black

Repeat the Drop shadow with its negative settings
Effects - Plugins - Filters unlimited 2.0 - Paper textures - Canvas Fine

Selections - Select none
5
Layers - New raster layer
Selections - Load/Save from the alpha channel the selection #3
Flood fill the selection with color 3 #c4b6ac
Selections - Select none
Effects - Distorsion effects - Curlicues with these
settings
Layers - Duplicate
Image - Mirror
Layers - Merge - Merge down
Effects - 3D effects - Drop shadow
1 / 1 / 40 / 1 with black
6
Load and Copy/Paste as a new image your duplicate of the tube 'MR_Lotus
Princess' (or your own image)
Image - Resize at 70% - uncheck 'Resize all layers'
Effects - Plugins - Alien Skin Eye Candy 5 Impact - Perspective shadow
and select the preset 'perspective_shadow_Vsp_Maryse'

7
Load and Copy/Paste as a new image your duplicate of 'Titre Maryse_VSP'
Layers - Properties - Blend mode at Luminance inherited
Layers - Merge - Merge visible
Layers - Duplicate
Effects - Plugins - AAA Frames, foto frame

Image - Resize at 90% - uncheck 'Resize all layers'
Effects - 3D effects - Drop shadow 0 / 0 / 60 / 20 with black
Highlight the bottom layer - Layer - New raster layer
Flood fill with white
Selections - Select all
Selections - Modify - Contract by 2 px
Edit - Cut
Selections - Select none
Highlight the bottom layer - Adjust - Blur - Motion blur

Layers - Duplicate
Image - Mirror
For this layer properties, select Opacity at 50
Layers - Merge - Merge all (Flatten)
Adjust - Sharpness - Sharpen
11
Sign and save as a jpg or File - Export as optimized jpeg file
I hope that you enjoyed making this tutorial.
Valérie has a gallery of all the results that she receives
from all over the world. She loves
to see your creations and include them in her gallery. Click here to send yours!!