jeudi 10 avril 2025

Paint Shop Pro - My translations - Joyeuses Pâques (valyscrappassion)


This tutorial is a personal creation from Valérie Savary, better known as
valyscrappassion.com

You can find the original here. Any resemblance with another one would be only pure coincidence.  It is strictly forbidden to modify tubes, to change their name or take off the watermarks, to present them on your sites or blog, to share them in groups, to make a bank of images or to use them on lucrative purposes.

Thank you to respect Valérie’s work and other artwork creators'work mentioned in the original tutorial.  Don’t hesitate to warn me if you have any trouble with this translation and I’ll try to fix the problem as quickly as I can.  You can reach me at here.

This tutorial was made on July 30, 2014, with an earlier PSP version.  I have used PSPX2 to make my translation; you can follow this tutorial with any other versions of PSP, but the result might be slightly different.


Download the zip file containing the materials, decompress and copy the originals; 
work with the copies.  For presets, double-click on them and they will install themselves.  For gradients, masks, selections, textures, simply place in your appropriate PSP folders.

 Colors
Foreground color #929f00
Background color #ffe305

Plugins
Graphic plus - Cross-shadow
Filters Unlimited 2 - Edges square


Let's begin!!!


1
Open a new transparent layer of 600 x 500 px

2
Selections - Select all
Open, Copy/Paste into the selection the tube 'papier1'
Selections - Select none

3
Layers - New raster layer
Selections - Select all
Open, Copy/Paste into the selection the tube 'papier2'
Selections - Select none
Effects - Filters Unlimited 2 - Edges square - Square edge 12

Effects - Drop shadow 2 / 2  /55 / 4 with color black


4
Layers - New raster layer
Selections - Select all
Open, Copy/Paste into the selection the tube 'papier3'

Selections - Select none
Image - Resize at 80% - uncheck 'Resize all layers'
Image - Free rotation - Left 5 - uncheck 'Rotate all layers'

Effects - 3D effects - Drop shadow with same settings as before
Adjust - Sharpness - Sharpen

5
Open, Copy/Paste as a new layer the tube 'poussin'
Image - Resize at 85% (unchecked 'Resize all layers' still in memory)
With your Move tool, place to the left
Effects - 3D effects - Drop shadow 1 / 1 / 65 / 15 with color black

6
Open, Copy/Paste as a new layer the tube 'tube_fleur'
Image - Free rotation to right at 5

With your Move tool, place it to the right
Effects - 3D effects - Drop shadow with same settings as before

7
Open, Copy/Paste as a new layer the tube 'nœud2'
Image - Resize at 60% twice
Image - Free rotation to the right at 10
Adjust - Sharpness - Sharpen
Move it as shown in the final result
Effects - 3D effects - Drop shadow with same settings as before


8
Image - Add symmetric borders at 10 with color #929f00
With your Magic wand, select the border
Effects - Plugins - Graphic plus - Cross shadow with default settings


Effects - Texture effects - Fur with default settings

Effexts - 3D effects - Cutout with these settings


 Repeat the Cutout effect with its negatives
Selections - Select none


9
Add symmetric borders of 15 with color #929f00
With your Magic wand, select the border
Selections - Invert
Effects - 3D effects - Drop Shadow 4 / 4 / 55 / 12

and repeat with its negatives
Selections - Select none

 10
Image - Add symmetric borders of 15 with color #ffe305
With your Magic wand, select the new border
Effects - Plugins - Graphic plus - Cross shadow with these settings


Effects - Texture effects - Mosaic - Glass with these settings

Selections - Invert
Effects - 3D effects - Drop shadow with same settings as before
Repeat the drop shadow effect with its negatives
Selections - Select none

11
With your Text tool, font Peace, 16  px, Bold checked, Stroke width at 2
Background color #ffe305 and Foreground with no color

Write your text and place it in the center of the image
Effects - Illumination effects - Sunburst
with default settings only changing to color #ffff80


Effects - 3D effects - Drop shadow 3 / 3 / 55 / 12 color black


12
Sign your result.
Layers - Merge - Merge all (Flatten)
Adjust - Sharpness - Sharpen
Save as a jpg or File - Export as an optimized jpg

We are done!!

I hope that you enjoyed making this tutorial.
Valérie has a gallery of all the results that she receives
from all over the world and she loves to see your creations and include them in her gallery. Click here to send yours!!


Paint Shop Pro - My tutorials - Illuminated Text


This tutorial is my own creation; I made it with PSPX and Animation Shop 3.1.1.  Any resemblance with another one would be only pure coincidence.  It is strictly forbidden to modify my images, to change their name or take off the watermarks in order to present them on your sites or blog, to share them in groups, to make a bank of images, or to use them on lucrative purposes.  You can write to me here if you need.

I made this tutorial for PSPX but you can use any version of PSP; the results might be slightly different.


 Materials
1 nice tube
(I made it in Bing Image Creator and you can use it if you want)

You will also need a nice font

Plugins
VM Distortion – any option that you like in the plugin – I selected Broken mirror

THE IMAGE
The image is worked in PSP and for the animation, we alternate from PSP to Animation Shop.

1
Open a png or Pspimage image of your choice in PSP or
select the one I offer you above.

2
Image – Information on image
Look at the size of your image
(the above image is 500 x 500 px)

3
Layers – New raster layer
Flood fill with your darkest color from your Materials
(this layer will serve as a background)
Layers – Arrange – Send to the bottom

4
With the bottom layer highlighted,
Layers – Load/Save mask – from disk
and select a round mask
– or –
Selections – Select the circle option
clicking from the center of your image, create a circle so that the
circle will enclose most of your main image/character
Selections – Invert
Click on your Delete key or the Scissors

5
Effects – Plugins – VM Distortion – Broken Mirror with these settings

Reduce the Opacity of this layer to 70% or lower if you wish
Note:  you can play with your plugins effects to find a suitable background to your liking, I just  want to show you how to work a semi-transparent background for an animated gif.

You should have this now:


6
Highlight your main image raster
Layers – Duplicate 7 or 8 times
Come back to your first main image raster,
Effects – 3D effects – Drop Shadow with these settings


7
Highlight the duplicate layer above it and
Effects – 3D effects – Drop Shadow with the same settings except for the colorselect another color from your range of
color that will contrast a bit with the previous drop shadow
either on the darker -and/or- lighter side and even white!
Close the visibility of this layer after you are done

8
Repeat the Drop Shadow from step 7 for all the
duplicate layers changing only the color of the drop shadow
selecting a darker or a lighter tone in order to create a slight change in color closing the visibility of all the duplicate layers up to the last one in the list

9
You should have this in your layers:

All the layers have their visibility off except
– the bottom layer
– your first image above it
– and the text layer at the top

10
Edit – Copy merged


THE ANIMATION
Now, open your Animation Shop
Paste as a new animation

11
Go back to PSP, close the visibility of the top layer
highlight the duplicate image below it
Edit – Copy merged

12
Back to Animation Shop, Paste after the selected frame

Repeat steps 11 and 12 for all your duplicate images,
going back and forth from your PSP to Animation Shop.
When all are done, you should have a total of 12 frames.

Run the animation by clicking in the Cinema icon and if you like it, Save as.. and give it a name. Your Optimization settings should be all settled and if not,  I suggest Katey's site because she explains wonderfully with lots of images

I hope that you will have a lot of fun making those tags for all occasions and if you have difficulties, write to me here.

BACK TO PSP INDEX   MY TUTORIALS  MY TRANSLATIONS  MY BANNERS


mercredi 9 avril 2025

Paint Shop Pro - My tutorials - Unicorn

This tutorial is a personal creation. Any resemblance with another one would be only pure coincidence. I would like to thank Bobbi Fein for testing this tutorial so that you get the best of this tutorial. It is strictly forbidden to modify my images, to change their name or take off the watermarks, to present them on your sites or blog, to share them in groups, to make a bank of images, or to use them on lucrative purposes.

The unicorn presented here is an AI Bing Image Creator made by me. The other images are mine. 
I have made this tutorial with PSPX on May 22, 2024. Thank you to respect my work and the creators work. Don’t hesitate to write to me here if you have any trouble with this tutorial and I’ll try to fix the problem as quickly as I can.


Decompress the zipped Materials file, open the files and save them
in your 'My PSP files' folder. 
For png and other images, duplicate them after taking away my watermark.

Work with your duplicates to preserve originals.
Open the mask and minimize them to tray for later use.
Copy/Paste selection into your My PSP files Selections folder.

Copy/Paste User's Defined Filter preset to your PSP Presets folder .
Double-click on the presets, if any, to install them and they will be saved automatically in their right place. Save your work often as a pspimage with all your layers just in case your PSP crashes!!

Plugins
Effects - Plugins - Medhi 1 - Wavy lab 1.1 - Style 'Bow
Alien Skin Eye Candy 5 Impact - Brushed metal
Alien Skin Eye Candy 5 Impact - Perspective shadow
Mura Meister's - Copies
Filters Factory Gallery J - Reverb

 Materials
1 Alien Skin Eye Candy 5 Impact preset
1 User's Defined Filter
1 PSPselection
1 mask
3 png images of my own creation

About the User's Defined Filters
I used a Laplacian filter in this tutorial in this tutorial.
I have 2 different Laplacian Edge filters in my presets and would like to share with you. 
Here is how you can make them:


Colors
Foreground color #edaeb9
Background color #805a64

 Let"s start!!

1
Create a new transparent image of 900 x 700 px
Flood fill with the Foreground color

2
Effects - Plugins - Medhi 1 - Wavy lab 1.1 - Style 'Bow'  100 / 70 / 80 / 80 with colors shown below:


3
Selections - Load/Save from disk 'lc-Selection#1'
Selections - Promote selection to layer
With your Foreground and Background in the Materials, make
a sunburst gradient

Layers - New raster layer
Selections - Load/Save from disk the selection 'lc-Selection#1'

Flood fill the selection with the gradient just created
Effects - Plugins - Alien Skin Eye Candy 5 Impact - Brushed metal
with the preset 'lc-zones' or these settings with Foreground color at Metal color

4
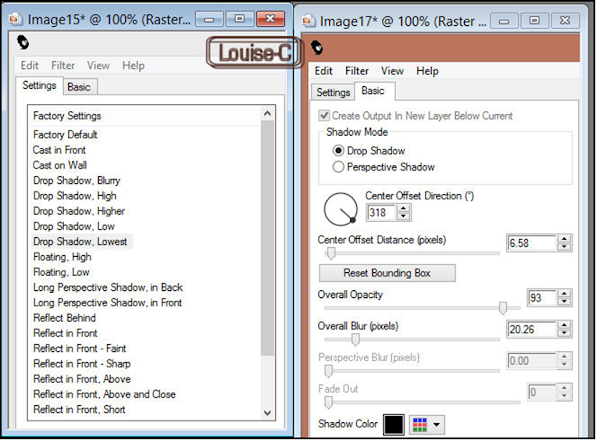
Effects - Plugins - Alien Skin Eye Candy 5 Impact - Perspective shadow - Drop shadow lowest or with these settings:

Selections - Select none

5
Load, Copy/Paste as a new layer the image 'lc-licorne-deco1'
Effects - Image effects - Offset Custom and Transparent checked


Effects - Plugins - Mura Meister's - Copies with Background color and these settings:

Layers - Merge - Merge down
Layers - Duplicate
Image - Flip
Layers - Merge - Merge down

6
Layers - New raster layer
Flood fill with your Background color #805a64
Open and minimize 'lc-mask-liquids'
Layers - New Mask layer from image 'lc-mask-liquids' - check Invert mask data

Layers - Merge - Merge group
At this point, I suggest that you save your image as a PSPimage for security

 7
Highlight raster 2

Layers - Duplicate
Layers - Arrange - Bring to top
Effects - Image effects - Seamless tiling

8
Load, Copy/Paste as a new layer the image 'lc-licorne'
Effects - Image - Offset


Blend mode of this layer at Luminance (Legacy)
Effects - Plugins - Alien Skin Eye Candy 5 Impact - Perspective shadow
Select the Drop Shadow mode, these settings with color white


9
Image - Add symmetric borders of 2 px with color #4d1b26
then 5 px with color white
Add symmetric borders of 50 px with color #4d1b26
With your Magic wand, select the 50 px border
Effects - Texture effects - Weave

Do not deselect yet
Effects - Plugins - Filters Factory Gallery J - Reverb

Effects - User's Defined Filters - 7x7 Laplacian Edge Detection
(see User's Defined Filters at the beginning of this tutorial)
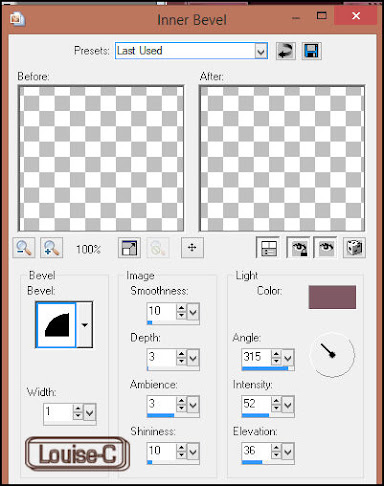
Effects - 3D effects - Inner bevel

Selections - Select none

 10
Image - Add a symmetric border of 2 px white
followed by a symmetric border of 1 px black
and a symmetric border of 70 px white
With your Magic wand, click in this 70 px white border to select it
Effects - Textures effects - Fur

Effects - 3D effects - Buttonize


Selections - Select none
 Load, Copy/Paste as a new layer the image 'lc-cadre'
(it is going to fill the last 70 px white border)
Layers - Merge - Merge all (Flatten)

11
Sign your image and save it as a jpg or
File - Export as an optimized jpeg

We are done!

You can send me your results here and I will be so happy to add them in here below!

BACK TO PSP INDEX     MY TUTORIALS    MY TRANSLATIONS     MY BANNERS

My tester, Bobbi Fein


Nicole

Leslie

Aage

Dieselmom


Marie S.


Grace

Barbara K.

Luna