
PAINT SHOP PRO
MY TUTORIALS
UNICORN


This tutorial is a personal creation. Any resemblance with another one would be only pure coincidence. I would like to thank Bobbi Fein for testing this tutorial so that you get the best of this tutorial. It is strictly forbidden to modify my images, to change their name or take off the watermarks, to present them on your sites or blog, to share them in groups, to make a bank of images, or to use them on lucrative purposes.
I have made this tutorial with PSPX on May 22, 2024. Thank you to respect my work and the creators work. Don’t hesitate to write to me here if you have any trouble with this tutorial and I’ll try to fix the problem as quickly as I can.

Decompress the zipped Materials file, open the files and save them
in your 'My PSP files' folder. For png and other images, duplicate them after taking away my watermark.
Plugins
Effects - Plugins - Medhi 1 - Wavy lab 1.1 - Style 'Bow
Alien Skin Eye Candy 5 Impact - Brushed metal
Alien Skin Eye Candy 5 Impact - Perspective shadow
Mura Meister's - Copies
Filters Factory Gallery J - Reverb
1 Alien Skin Eye Candy 5 Impact preset
1 User's Defined Filter
1 PSPselection
1 mask
3 png images of my own creation
About the User's Defined Filters
I used a Laplacian filter in this tutorial in this tutorial.
I have 2 different Laplacian Edge filters in my presets and would like to share with you. Here is how you can make them:

Foreground color #edaeb9
Background color #805a64
Let"s start!!
1
Create a new transparent image of 900 x 700
px
Flood fill with the Foreground color
2
Effects - Plugins - Medhi 1 - Wavy lab 1.1 - Style
'Bow' 100 / 70 / 80 / 80 with colors shown below:

Selections - Load/Save from disk 'lc-Selection#1'
Selections - Promote selection to layer
With your Foreground and Background in the Materials, make
a sunburst gradient

Layers - New raster layer
Selections - Load/Save from disk the selection
'lc-Selection#1'

Flood fill the selection with the gradient just created
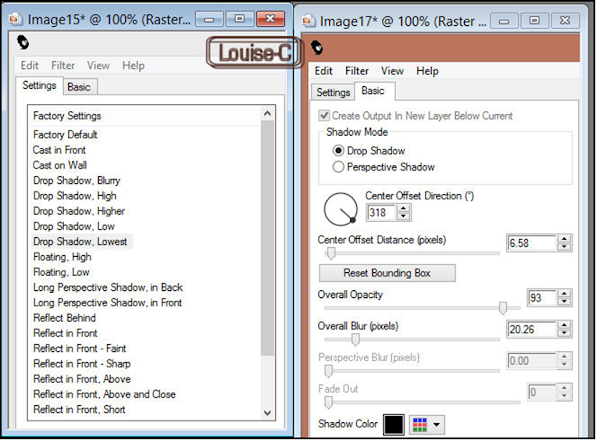
Effects - Plugins - Alien Skin Eye Candy 5
Impact - Brushed metal
with the preset 'lc-zones' or these settings with
Foreground color at Metal color

4
Effects - Plugins - Alien Skin Eye Candy 5
Impact - Perspective shadow - Drop shadow lowest or with these settings:
Selections - Select none
5
Load, Copy/Paste as a new layer the image 'lc-licorne-deco1'
Effects - Image effects - Offset Custom and
Transparent checked

Layers - Merge - Merge down
Layers - Duplicate
Image - Flip
Layers - Merge - Merge down
6
Layers - New raster layer
Flood fill with your Background color #805a64
Open and minimize 'lc-mask-liquids'
Layers - New Mask layer from image 'lc-mask-liquids'
- check Invert mask data
Layers - Merge - Merge group
At this point, I suggest that you save your image as a
PSPimage for security
Highlight raster 2
Layers - Duplicate
Layers - Arrange - Bring to top
Effects - Image effects - Seamless tiling
8
Load, Copy/Paste as a new layer the image 'lc-licorne'
Effects - Image - Offset
Blend mode of this layer at Luminance (Legacy)
Effects - Plugins - Alien Skin Eye Candy 5 Impact - Perspective
shadow
Select the Drop Shadow mode, these settings with
color white
9
Image - Add symmetric borders of 2 px with color #4d1b26
then 5 px with color white
Add symmetric borders of 50 px with color #4d1b26
With your Magic wand, select the 50 px border
Effects - Texture effects - Weave
Do not deselect yet
Effects - Plugins - Filters Factory Gallery J - Reverb
Effects - User's Defined Filters - 7x7 Laplacian Edge
Detection
(see User's Defined Filters at the beginning of this
tutorial)
Effects - 3D effects - Inner bevel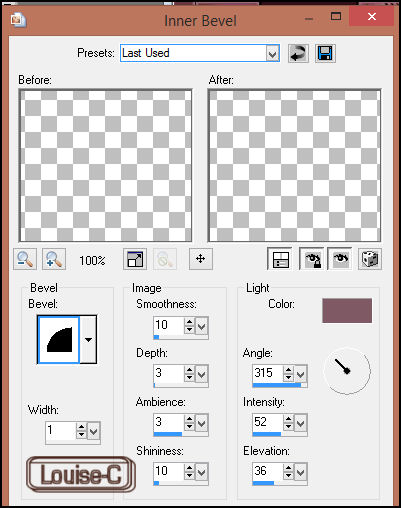
Selections - Select none
Image - Add a symmetric border of 2 px white
followed by a symmetric border of 1 px black
and a symmetric border of 70 px white
With your Magic wand, click in this 70 px white border to
select it
Effects - Textures effects - Fur
Effects - 3D effects - Buttonize
Selections - Select none
(it is going to fill the last 70 px white border)
Layers - Merge - Merge all (Flatten)
11
Sign your image and save it as a jpg or
File - Export as an optimized jpeg
We are done!
You can send me your results here and I will be so happy to add them in here below!
BACK TO PSP INDEX MY TUTORIALS MY TRANSLATIONS MY BANNERS
My tester, Bobbi Fein

Leslie


Marie S.

Grace


Aucun commentaire:
Enregistrer un commentaire