vendredi 11 avril 2025

Paint Shop Pro - My tutorials - Strawberry Queen


This tutorial is a personal creation.
Any resemblance with another one would be only pure coincidence.

It is strictly forbidden to modify my images, to change their name or take off the watermarks in order to present them on your sites or blog, to share them in groups, to make a bank of images, or to use them on lucrative purposes.

I have made this tutorial with PSPX on May 2, 2024. Thank you to respect my work and the creators work. Don’t hesitate to write to me here if you have any trouble with this tutorial and I’ll try to fix the problem as quickly as I can. 


Decompress the zipped Materials file, open the files and save them in
their respective My PSP files folder.  For png and other images, duplicate them after taking away my watermark, if any.  Work with your duplicates to preserve originals.  Copy/Paste the gradient into your PSP files in the Gradients folder.  Copy/Paste the pattern into your PSP files in the Patterns folder.

Save your work often as pspimage with all your layers just in case your PSP crashes!!

Materials
1 pattern 'Plaid 30'
1 gradient 'Bicromia rosso'
3 images of my creation

Plugins
User's Defined filters - Emboss 3
Alien Skin Eye Candy 5 Impact - Glass
VM Natural - Lakeside Reflection
Simple - Blintz and Pizza Slice Mirror
 

1
Open a new transparent image of 900 x 700 px

2
In your Materials, after selecting these colors
Foreground color 1 #eec3ca
Background color 2 #dc5454
click in your Foreground icon and select the Pattern Plaid 30 (in the Materials)

3
Flood fill your image with this plaid pattern
Adjust - Sharpness - Sharpen

4
Selections - Select all - Modify - Contract of 50 px
Selections - Promote selection to layer
With your Background color in the Foreground selected color, flood fill the selection
Selections - Float
Selections - Defloat
Selections - Modify - Select Selection borders
and check 'Outside' and 'Antialias' and set at 8 px


Flood fill this border with the linear gradient 'Bicromia Rosso' (included in the Materials)
Angle 310 and 10 Repeats

(Note: I obtained a series of gradients from the same site many years ago but I forgot the URL. I want to thank this person for his collection of
wonderful gradients)
Selections - Select none

5
With your Magic wand, Tolerance 0 and Feather 0,
click in the center of the image to select this color rectangle
Copy/Paste in the selection the image 'lc-strawberry-forever'
Effects - Plugins - VM Natural - Lakeside Reflection with default settings
except for the Horizon at 222


Selections - Select none

6
Copy/Paste as a new raster the image 'strawberry-queen'
With your Move tool, place it on the right lower corner of the image


At this point, save as a Pspimage, just in case

7
Image - Resize check 'Resize all layers' at 85%
Image - Add symmetric borders of 50 px with the Background color
With your Magic wand, click in this color
Copy/Paste into the selection your strawberry queen (it should still be in the memory)
Effects - Plugins - Simple - Blintz
Effects - Plugins - Simple - Pizza slice mirror
Do not deselect

8
With your 50 px border still selected:
Adjust - Blur - Gaussian blur at 20
Effects - Texture effects - Mosaic Antique with these settings:

Effects - User's Defined filters - Emboss 3 (should already be in your options)


Do not deselect yet!

8
Selections - Modify - Select selection borders 5 px both sides
Flood fill with the gradient previously used
Effects - 3D effects - Outer bevel with these settings and color

Selections - Select none

10
With your Text tool, write your text - I used
Scriptomania Hostess font size 50 but you can use whatever font you like
or if you prefer, use my text image 'lc-text' in the Materials
Effects - 3D effects - Drop shadow 2/2/58/4 with color black

 11
Image - Add borders - 2 px black

12
Sign and save your image as a jpg or File - Export as an optimized jpg

 You are done!

I hope that you enjoyed making this tutorial as much as I had fun making it! I added a little more to my result with an animation with Sqirlz Water Reflections using the 'circles only' feature. You can get the Sqirlz Water Reflections here. There are tutorials inside the program under Examples.

Send me your creation here and I will gladly add it below!

Paint Shop Pro - My tutorials - Disappearing Mouse


This is a tutorial inspired by another tutorial from a group on Animation Shop owned by Carin, a wonderful Animation Shop teacher; it was her lesson 31 entitled 'Lazy Tiger'.  You can apply to her group here.  I can assure you that you will not regret it!

This tutorial is basically 2 images worked separately that we unite in Animation Shop.


Materials
1 alpha-channel pspimage
1 Brushtip to save in your 'My PSP Files' under the Brushes folder
In case you cannot get the brush from your Brushes after you have imported it, 
I also enclosed the corner image as a png file in the zip
2 masks
1 jpg image

Plugins
Carolaine & Sensitivity - CSL-Dots
Alien Skin Eye Candy Impact 5 - Pespective shadow

Colors
Foreground color 1 #95440d
Background color 2 #b89953
Additional color 3 #c7a043

Let's begin!

 BACKGROUND IMAGE

1
Open the pspimage image 'alpha-channel-mouse-lc'
Window - Duplicate
Never work on an original, you could need it intact later on

 2
Flood fill with Sunburst gradient with these settings
and Foreground color #95440d and Background color black

3
Open the mask '1250181704_nikita_masques' and minimize it
Back to your image:
Layers - Load/Save mask from Picture

and select '125081704_nikita_masques' from the options

Layers - Merge - Merge group

 4
Layers - New raster layer
Change your colors in your Materials with
Foreground color #95440d and Background color #c7a043


Your gradient changes at the same time; you leave it like that and
Flood fill with this gradient
Layers - Arrange - Send to bottom or Move down

5
Highlight the top layer
Effects - Plugins - Carolaine and Sensitivity - CSL-Dots: 112 - 240 - 18

6
Layers - New raster layer
Using your Paint brush tool, select the leaf motif 'klorn_003'
In your Materials, using the same gradient previously made (at step 4)


Click in the upper left corner
Effects - 3D effects - Drop shadow  -1 / -1 / 100 / 1 with color black
Layers - Duplicate
Image - Flip
Layers - Merge - Merge down
Layers - Duplicate
Image - Mirror
Effects - 3D effects - Drop shadow  1 / 1 / 100 / 1 with color black

 7
Layers - New raster layer
Selections - Save/Load selection from alpha-channel layer
Flood fill the selection with color #c7a043
Effects - Buttonize with these settings 75 / 45 / 61 check Transparent and color black

Still selected,
Effects - Plugins - Alien Skin Eye Candy 5 Impact - Perspective shadow
and enter these settings in Basic:

Note: you could save these settings by clicking in Manage and naming it; it is very efficient and appropriate for many uses.

Selections - Select none
Layers - Merge - Merge all (Flatten)
File - Save as a jpg file and name it 'background-image'
Your background image is done.

We will now work on the animated part of the image that will be placed in the centre of it.  Let's start!!!

ANIMATED MIDDLE IMAGE

1
In your PSP, open image 'black-white-slats' from the Materials
Windows - Duplicate and close the original
Always work on the duplicate - never on the original
Layers - Promote background to layer
In your image and with your Magic wand with Tolerance 25, Feather 0


Click inside the white part (between the black slats); 
zoom in if you need to see better

The whole white part will be selected; delete using your Delete key or the Scissors
Selections - Invert
Now, all the black parts become selected

2
Open your image 'lc-mouse1.jpg'
Copy/Paste into the selection
Effects - Buttonize with same settings as before (which should be in memory)
Selections - Select none
Your image should look like this:


Duplicate this image in order to obtain a total of 9 layers,
one layer for each slat in the image
This is what we want to achieve:

You will notice that the complete image is at the bottom and one by one, as we
go up in the layers, one slat is disappearing. If we would have had a slat template with 14 parts, there would be 14 layers.

We start the animation with the complete image so that when we place it
in the middle of the larger background image, we can see where we put the animation. Then, 'Animation - Reverse frames' in order to have the animation start with the middle square. In other words, here is what we do:

Starting from layer 9, we will delete all the slats except the little square in the middle. To help us, we close the visibility of all layers except the one that we are working on.

Layer 9 (the top layer):
Highlight layer 9.  Zoom into the image to see what you are doing.
Using your Selection tool (Rectangle), select the small square in the middle,
Selections - Invert - Delete with your Delete key
Selections - Select none

We are left with the single square in the middle like this:


Layer 9 done! Close the visibility of layer 9
Note: I have used the Rectangle selection tool for the deleting part in the lower layers but if you are more familiar with the Eraser, please use it. Layer 8 will contain 2 slats, Layer 7 will contain 3 slats, etc..etc.. The bottom layer will stay complete. 

Layer 8
Open the visibility of layer 8 and activate this layer.
Using your Selection tool, Freehand selection - Selection type Point to point 

Start your selection at the right lower angle of the small square and follow the path indicated below going up:

You left-click every time that you change direction, making sure that
you do not include a mouse bit. To close the selection, right-click.
Selections - Invert - Delete
Selections - Select none
Close visibility of layer 8
Layer 8 done!!

Layer 7
Open the visibility of layer 7 and activate it.
Start your selection at the right lower angle of the small square and follow the path indicated below:

Selections - Invert - Delete
Selections - Select none
Close visibility of layer 7
Layer 7 done!!

Layer 6
Open the visibility of layer 6 and activate it.
Start your selection at the right lower angle of the small square and follow the path indicated below:

 Selections - Invert - Delete
Selections - Select none
Layer 6 done!!

Continue like this, including another slat as you go, always following the way to select the slats to be deleted.
Your end result should look as previously shown but here is a reminder
:

Before saving it as a psp file, make sure that all the eyes of visibility are opened for all the layers. Now, name this work 'final-mouse-animation' and save it as a psp file.

HOW TO ANIMATE YOUR IMAGE
Open your Animation Shop.
File - Open 'background-image.jpg'
Copy - Paste after the current frame
There are many ways to multiply a frame to
obtain a larger number of the same frame;
 it will be for you to use whatever method that you like.
We need a total of 
20 frames of this background image
Here is what you should have in your Animation Shop:

Edit - Select all

 In your background image, select frame 1 and with your SHIFT key, click into your frame 9
Frames 1 to 9 are selected. Leave this work aside.

Now, open your mouse animation:
 File - Open 'final-mouse-animation.psp'
(enlarge in order to see all the frames)

Edit - Select all - Edit - Copy
Go to your 'background-image.psp' and Paste into selected frames,
clicking inside the middle square so that the animated mouse
will correspond with the middle square.
When you are certain of the emplacement, release the click
Animation - Reverse frames

Select your frame 11 and with your SHIFT key,
click into your frame 19
Frames 11 to 19 are selected.
Your selection is still in memory so in your 'background-image.psp',
Paste into selected frames

 Open the image 'text-1'
Edit - Copy
Back to your image, click into your frame 10 and paste it in the selected frame, in the middle

Open the image 'text-2'
Edit - Copy
Back to your image, click into your frame 20 and paste it in the selected frame, in the middle

 If you prefer some other text, in Animation Shop:
With your text tool, colors to your liking, select your font
I used Copperplate Gothic with these settings


Write your text
Place your text in the middle of the square
 Go to frame 20 and write your text
Place it in the middle of the square

Go to your frame 1
Edit - Select all
Frame properties at 35
Select frames 10 and 20 (holding CTRL key)
Frame properties at 125

Your animation is done.
Apply your watermark to it and save it as a gif.
I hope that you enjoyed this tutorial; it is quite long but it is very satisfying!!!  Send me your versions and I will post them below.

BACK TO PSP INDEX   MY TUTORIALS   MY TRANSLATIONS    MY BANNERS

jeudi 10 avril 2025

Paint Shop Pro - My translations - Krys (valyscrappassion)


This tutorial is a personal creation from Valérie Savary, better known as valyscrappassion.com


You can find the original here.
Any resemblance with another one would be only pure coincidence.
It is strictly forbidden to modify tubes, to change their name or take off the watermarks, to present them on your sites or blog, to share them in groups, 
to make a bank of images or to use them on lucrative purposes.

Thank you to respect Valérie’s work and other creators' work mentioned in the original tutorial. Don’t hesitate to warn me if you have any trouble with this translation and I’ll try to fix the problem as quickly as I can.  You can reach me here.

 This tutorial was made on October 12, 2015, with an earlier PSP version.  I have used PSPX5 to make my translation; you can follow this tutorial with any other versions of PSP, but the result might be slightly different.


Material
1 alpha layer
1 color palette
1 tube image of a Krys character
1 mask VSP
2 presets
3 tubes VSP

Thanks to tube creators and mask designer; I ask you to respect their conditions if you use their creations.

 Plugins
Alien Skin Eye Candy 5 Impact - Perspective Shadow
Mura's Meister - Perspective tiling
Carolaine and Sensibility - CS-LDots
Simple - Pizza Slice Mirror
I.C. NET Software - Unlimited filters: Texturize - Raw Canvas
VM Texture - Cross Weave

 Colors
Foreground color 1 #d7ca5c
Background color 2 #a73914
Supplement color 3 #646735


Preparation
Double-click on the presets and they will self-install.
Open tubes and duplicate them, minimizing them until needed;
Save the mask in your 'My PSP Files' in the Mask folder, open it in your
workspace and minimize it until needed.

Let's start!!

1
Open the alpha layer supplied in the Materials
Window - Duplicate
and close the original. 
Work on the copy and save as a PSPimage as
you add layers to avoid losing your work.

Flood fill the layer with color 1
Selections - Select all
Activate your copy of tube M4nZ9P-wHSpsMCzwMB0S382wOok (delete the signature)
Copy/Paste in the selection
Selections - Select none
Effects - Image effects - Seamless tiling with default settings

Adjust - Blur - Gaussian blur at 30
Layers - Duplicate

2
Effects - Plugins - I.C.NET Software - Filters Unlimited 2.0 - VM Texture - Cross Weave with these settings:

Layers - Properties - Opacity to 15
Activate the bottom layer
Layers - Duplicate
Reactivate the layer above it
Layers - Merge - Merge down
Layers - Duplicate
Your Layers palette should look like this:

3
Your top layer highlighted,
Effects - Plugins - Simple - Pizza Slice Mirror
Effects - Image effects - Seamless tiling with default settings as before


4
Selections - Load/Save a selection - From the alpha channel and select Selection #1

Selections - Promote selection to layer
Effects - Plugins - Carolaine and Sensibility - CS-LDots

5
Activate the layer below this selection
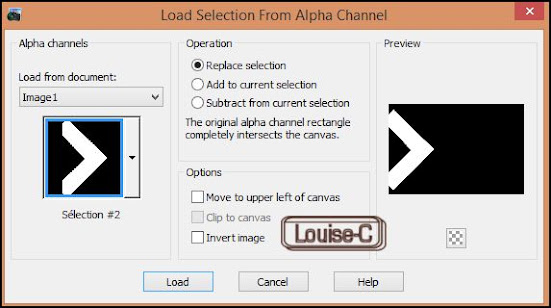
Selections - Load/Save a selection - From the alpha channel and select Selection #2


Selections - Promote selection to layer

Effects - Plugins - I.C.NET Software - Filters Unlimited 2.0 - Texturize - Raw Canvas

Selections - Select none
Effects - Simple - Blintz
Layers - Duplicate
Image - Mirror
Image - Flip
Layers - Merge - Merge down

6
Highlight the layer under
Selections - Load/Save a Selection - From the alpha channel and select Selection #3

Selections - Promote selection to layer
Selections - Select none
Effects - Plugins - I.C.NET Software - Filters Unlimited 2.0 - Paper Textures - Hemp Paper 2

7
Close the visibility of the 2 layers at the bottom

Layers - Merge - Merge visible

8
Highlight the middle layer
Layers - Arrange - Bring to top
Effects - Plugins - Mura's Meister - Perspective tiling

Image - Mirror

9
Highlight the middle layer
Image - Resize at 83% uncheck 'Resize all layers'


Effects - Image effects - Offset

Effects - 3D effects - Drop shadow 0/0/65/50 with black

10
Highlight the bottom layer
Layers - New raster layer
Flood fill with color 3 #646735
Layer - New mask layer - From an image and select 'vsp008'
checking Invert mask data

Layers - Merge - Merge group
Effects - Plugins - Carolaine and Sensibility - CS-LDots with same settings as before
Effects - 3D effects - Drop shadow with same settings as before

11
Highlight the top layer
Copy/Paste as a new layer the tube 'M4nZ9P-wHSpsMCzwMB0S382wOok'
Image - Resize at 75% unchecking 'Resize all layers'
Adjust - Sharpness - Sharpen
Effects -  3D effects - Drop Shadow 0/50/65/60 with black

Effects - Plugins - Alien Skin Eye Candy 5 impact - Perspective Shadow and select preset 'shadowVSPKrys2' furnished in the Materials

12
Open, Copy/Paste as a new layer the tube 'deco1VSP'
Activate the Pick tool and place these settings


13
Open, Copy/Paste as a new layer the tube 'titreVSP"
Activate the Pick tool and place these settings

14
Open the visibility of the bottom layer
Highlight the layer at the bottom of the pile
Effects - Art Media effects - Brush strokes

Save as a PSPimage before this next step, in case you should want to
retouch the layers
Layers - Merge - Merge visible

15
Image - Add borders of 1 px - color 2 #a73914
Image - Add borders of 3 px - color 1 #d7ca5c
Image - Add borders of 1 px - color 2 #a73914

16
Selections - Select all
Image - Add borders of 50 px - color 1 #d7ca5c
Selections - Invert
Flood fill with this Sunburst gradient


Effects - Distortion effects - Pixelate

Effects - Edge effects - Enhance more

17
Selections - Invert
Effects - 3D effects - Drop shadow 0/0/65/50 with black
Selections - Select none

18
Image - Add borders of 1 px with color 2 #a73914
Image - Add borders of 3 px with color 1 #d7ca5c
Image - Add borders of 1 px with color 2 #a73914

19
Open, Copy/Paste as a new layer the tube deco2VSP
Layers - Merge - Merge all (Flatten)
Adjust - Sharpness - Unsharp mask

20
Sign and save as a jpg or File - Export as a jpeg optimized file

I hope that you enjoyed making this tutorial.  I had a lot of fun translating it.
If you do it, please send your result to Valérie here;
I know she loves to add them in her gallery.