PAINT SHOP PRO
MY TRANSLATIONS
KRYS
This
tutorial is a personal creation from Valérie Savary, better known as valyscrappassion.com
You can find the original here.
Any resemblance with another one would be only pure coincidence.
It is strictly forbidden to modify tubes, to change their name or take off the
watermarks, to present them on your sites or blog, to share them in groups, to
make a bank of images or to use them on lucrative purposes.
Thank
you to respect Valérie’s work and other creators' work mentioned in the
original tutorial. Don’t hesitate to warn me if you have any trouble with this translation and I’ll try to fix the problem as quickly as I can. You can reach me here.
This tutorial was made on October 12, 2015, with an earlier PSP version. I have used PSPX5 to make my translation; you can follow this tutorial with any other versions of PSP, but the result might be slightly different.
Material
1
alpha layer
1 color palette
1 tube image of a Krys character
1 mask VSP
2 presets
3 tubes VSP
Thanks
to tube creators and mask designer; I ask you to respect their conditions if
you use their creations.
Plugins
Alien Skin Eye Candy 5 Impact - Perspective Shadow
Mura's Meister - Perspective tiling
Carolaine and Sensibility - CS-LDots
Simple - Pizza Slice Mirror
I.C. NET Software - Unlimited filters: Texturize - Raw Canvas
VM Texture - Cross Weave
Colors
Foreground
color 1 #d7ca5c
Background
color 2 #a73914
Supplement
color 3 #646735
Preparation
Double-click on the presets and they will self-install.
Open
tubes and duplicate them, minimizing them until needed;
Save
the mask in your 'My PSP Files' in the Mask folder, open it in your
workspace and minimize it until needed.
Let's
start!!
1
Open the alpha layer supplied in the Materials
Window - Duplicate
and close the
original. Work
on the copy and save as a PSPimage as
you
add layers to avoid losing your work.
Flood fill the layer with color 1
Selections
- Select all
Activate
your copy of tube M4nZ9P-wHSpsMCzwMB0S382wOok (delete the signature)
Copy/Paste in the selection
Selections
- Select none
Effects - Image effects - Seamless tiling with
default settings
Adjust
- Blur - Gaussian blur at 30
Layers - Duplicate
2
Effects - Plugins - I.C.NET Software - Filters Unlimited 2.0 - VM Texture -
Cross Weave with these settings:
Activate the bottom layer
Layers - Duplicate
Reactivate the layer above it
Layers - Merge - Merge down
Layers - Duplicate
3
Your top layer highlighted,
Effects - Plugins - Simple - Pizza Slice Mirror
Effects - Image effects - Seamless tiling with default settings as before
Selections - Load/Save a selection - From the alpha channel and select Selection #1
5
Activate the layer below this selection
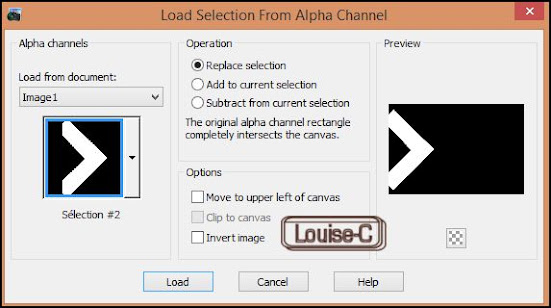
Selections - Load/Save a selection - From the
alpha channel and select Selection #2
Selections
- Promote selection to layer
Selections
- Select none
Effects
- Simple - Blintz
Layers - Duplicate
Image
- Mirror
Image
- Flip
Layers
- Merge - Merge down
6
Highlight the layer under
Selections - Load/Save a Selection - From the
alpha channel and select Selection #3
Selections - Select none
Effects - Plugins - I.C.NET Software - Filters Unlimited 2.0 - Paper Textures - Hemp Paper 2
Close the visibility of the 2 layers at the bottom
Layers
- Merge - Merge visible
8
Highlight the middle layer
Layers
- Arrange - Bring to top
Effects - Plugins - Mura's Meister - Perspective
tiling
Image
- Mirror
9
Highlight the middle layer
Image
- Resize at 83% uncheck 'Resize all layers'
10
Highlight the bottom layer
Layers
- New raster layer
Flood
fill with color 3 #646735
Layer
- New mask layer - From an image and select 'vsp008'
checking Invert mask data
Layers
- Merge - Merge group
Effects
- Plugins - Carolaine and Sensibility - CS-LDots with same settings as before
Effects
- 3D effects - Drop shadow with same settings as before
11
Highlight the top layer
Copy/Paste as a new layer the tube 'M4nZ9P-wHSpsMCzwMB0S382wOok'
Image - Resize at 75% unchecking 'Resize all layers'
Adjust - Sharpness - Sharpen
Effects - 3D effects - Drop Shadow 0/50/65/60 with black
Effects - Plugins - Alien Skin Eye Candy 5 impact - Perspective Shadow and select preset 'shadowVSPKrys2' furnished in the Materials
12
Open, Copy/Paste as a new layer the tube 'deco1VSP'
Activate the Pick tool and place these settings
14
Open the visibility of the bottom layer
Highlight the layer at the bottom of the pile
Effects - Art Media effects - Brush strokes
Save
as a PSPimage before this next step, in case you should want to
retouch
the layers
Layers
- Merge - Merge visible
15
Image - Add borders of 1 px - color 2 #a73914
Image - Add borders of 3 px - color 1 #d7ca5c
Image - Add borders of 1 px - color 2 #a73914
16
Selections - Select all
Image
- Add borders of 50 px - color 1 #d7ca5c
Selections
- Invert
Flood
fill with this Sunburst gradient
Effects - Edge effects - Enhance more
17
Selections - Invert
Effects - 3D effects - Drop shadow 0/0/65/50 with black
Selections - Select none
18
Image - Add borders of 1 px with color 2 #a73914
Image - Add borders of 3 px with color 1 #d7ca5c
Image
- Add borders of 1 px with color 2 #a73914
19
Open, Copy/Paste as a new layer the tube deco2VSP
Layers - Merge - Merge all (Flatten)
Adjust - Sharpness - Unsharp mask
20
Sign and save as a jpg or File - Export as a jpeg optimized file
I
hope that you enjoyed making this tutorial.
I had a lot of fun translating it.
If
you do it, please send your result to Valérie here;
I know she loves to add them in her gallery.


Aucun commentaire:
Enregistrer un commentaire