vendredi 21 mars 2025

 PAINT SHOP PRO 

MY TRANSLATIONS

BLOEMEN

This tutorial is a personal creation from Valérie Savary - better known as

I have her written permission to translate her tutorials and you can find the original hereAny resemblance with another one would be only pure coincidence. It is strictly forbidden to modify tubes - to change their name or take off the watermarks - to present them on your sites or blog - to share them in groups - to make a bank of images or to use them on lucrative purposes.

Thank you to respect Valérie’s work and other artwork creators'work mentioned in the original tutorial.
Don’t hesitate to warn me if you have any trouble with this translation
and I’ll try to fix the problem as quickly as I can.  You can reach me at here.

 This tutorial was made by Valérie on February 1st, 2017, with an earlier PSP version.  I have used PSPX to make my translation. You can follow this tutorial with any other versions of PSP, but the result might be slightly different.

Download the zip file containing the materials, decompress and copy the originals; work with the copies.  For presets, double-click on them and they will install themselves. For gradients, masks, selections, textures, simply place in your appropriate PSP folders.

Always make duplicates of the originals and work on the duplicates.
This will ensure you to have intact originals should you experience a problem with your PSP.
Also, save your work often for the same reasons. 


Materials

1 alpha channel layer

1 preset

2 Narah's masks

1 tube by Jeanne

1 brush by Linda

5 tube images


Colors

Foreground color 1 #adcd0f

Background color 2 #36370d

Additional color 3 #e4e4e4

Additional color 4 #ffffff


Filters
Alien Skin Eye Candy 5 Impact
Carolaine and Sensibility
L en K landksiteofwonders - L en K's Zitah
Mehdi
RCS Filter Pak 1.0 - RCS TripleExposure
Toadies
Dans Unlimited 2.0:
Distortion Filters - Smelter 2


1
Open the 'alpha-Bloemen-VSP layer'

Window - Duplicate and close the original
Set Foreground color 1 and Background color 2
Effects - Plugins - Mehdi - Wavy Lab 1.1
Enter color #e4e4e4 in indicated places


Effects - Reflection effects - Feedback


Effects - Plugins - <ICNET Software> - Filters Unlimited 2.0 - Distortion Filters - Smelter 2


2
Selections - Load/save selection - Load selection from alpha channel - Selection#1

Selections - Promote selection to layer
Effects - Plugins - L to K landksiteofwonders - L to K's Zitah
with these settings:

Selections - Select none
Effects - Plugins - Alien skin eye candy 5 impact - Perspective Shadow - Drop Shadow - Blurry

3
Activate the 'Bloemen-Deco1-VSP' tube
Edit - Copy/Paste as new layer in your image
Layers - Arrange - Move down
Using the select tool (Type the letter K on your keyboard to activate it)
enter Position X at 401 and Position Y at 62
(Type the letter M on your keyboard to deactivate the tool)

4
 Activate the bottom layer 
Selections - Load/Save Selection - Load Selection from Alpha Channel and select Selection#2 


Layers - New Raster Layer 

Flood fill the selection with color 2 #36370d
Effects - Plugins - Toadies - Rasterline


Effects - Plugins - Carolaine and Sensibility - CS-LDots


Effects - Edge Effects - Enhance 

Selections - Select None 

Effects - Plugins - Toadies - What are You?


 Edit - Repeat What are You? with the same settings

5
 ​​Your layer palette looks like this


Activate the top layer
Layers - Merge - Merge down twice 

6
 Layers - New Raster Layer
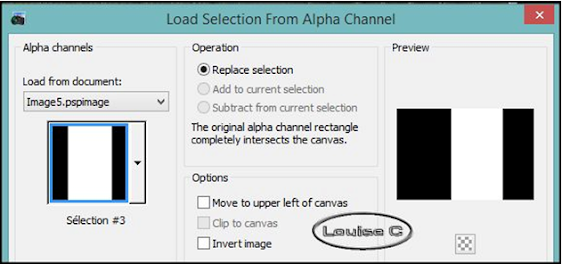
Selections - Load/Save Selection - Load Selection from Alpha Channel - Selection#3

Flood fill with color 2 #36370d
Selections - Modify - Contract by 3
Hit your Delete key or click on the Scissors
Keep Selection Active 

7
 Activate the image 'Jeanne_Flower_Beautiful_Flower_White_26_04_2015' 
Edit - Copy/Paste as New Layer in your image
Rearrange your layers so that they look like this:


Activate your raster 4 layer (the flower)
With the Move Tool - Move your tube to keep the parts you want to keep in the frames
Selections - Invert 
Edit - Hit your Delete key or use your Scissors 
Selections - Select None 
Effects - Plugins - Alien Skin Eye Candy 5 Impact - Glass and select the preset 'Bloemen-Glass-VSP'


Or enter these settings:


Activate your top layer
Layers - Merge - Merge Down
Effects - Plugins - Alien Skin Eye Candy 5 Impact - Perspective Shadow - Drop Shadow - Blurry as before


8
Layers - New Raster Layer
Flood fill with color 3 #e4e4e4
Layers - New Mask Layer - From Image and select 'Narah_mask_0709'

Layers - Merge - Merge Group
Effects - Image Effects - Offset

Effects - Edge Effects - Enhance

9
Open the image 'Bloemen-Deco2-VSP'
Edit - Copy/Paste as new layer in your image
Effects - Image Effects - Offset

Effects - 3D Effects - Drop Shadow 3/5/65/10 with color black

10
Activate the 'Bloemen-Deco3-VSP tube'
Edit - Copy/Paste as new layer in your image
Effects - Texture Effects - Blinds

11
Layers - Arrange - Move down this layer 3 times so that it is now
under the 3 little frames, like this:

 12
Activate again the 'Jeanne_Flower_Beautiful_Flower_White_26_04_2015' tube
Edit - Copy/Paste as new layer in your image
Layers - Arrange - Bring to top
Image - Mirror
Image - Resize to 85%, uncheck 'Resize All layers'
Effects - Image Effects - Offset


Adjust  - Sharpness - Sharpen 
Effects - 3D Effects - Drop Shadow 0/50/40/10 black 


13
 Open the image 'Text-BloemenVSP'
Edit - Copy/Paste as new layer
Effects - 3D Effects - Drop Shadow 2/2/100/0 - Color 1 #adcd0f
Layers - Merge - Merge layer below (4 times) 


14
 Bring color 3 #e4e4e4 in both Foreground and Background
Layers - New raster layer
Activate the Brush tool and select 'LF-Brush-Happy-Easter'
entering these settings


Click like this 

Layers - Arrange - Move down 
Effects - 3D Effects - Drop Shadow 1/1/65/1 black (I did it twice)


15
 Layers - New raster layer 
Flood fill with color white 
Layers - New mask layer - From image and select 'Mask Narah_mask_0717'


Layers - Merge - Merge group 
Effects - Edge Effects - Sharpen 
Your layers palette looks like this: 


16
 Activate the layer at the bottom
Edit - Copy 
Image - Add Borders of 1 - Color 2 #36370d
Image - Add Borders of 1 - Color 1 #adcd0f
Selections - Select All 
Image - Add Borders of 50 - Color 4 with white
Selections - Invert 
Edit - Paste into Selection (the layer in memory) 
Keep Selection Active 

17
 Effects - Plugins - RCS Filter Pak 1.0 - RCS TripleExposure with default settings


Image - Mirror
Effects - Texture Effects - Blinds with color 2 #36370d


Selections - Invert 
Effects - 3D Effects - Drop Shadow 0/0/65/50 with black 
Selections - Select None 


18
 Activate the 'Bloemen-Deco4-VSP' tube
Edit - Copy/Paste as new layer 
It's in the right place
Effects - 3D Effects - Drop Shadow 0/0/65/15 with black


19
Image - Add Symmetric borders 1 - Color 1 #adcd0f
Image - Add Symmetric borders 1 - Color 2 #36370d
Image - Resize to 900 pixels wide - All layers checked
Adjust - Sharpness - Unsharp Mask


20
Sign and save as jpg or File - Export - As an optimized jpeg

There you go!  It's done!

Thank you very much for your achievement.

Don't hesitate to send your creations to Valérie so that she can put them in her gallery...


BACK TO INDEX PAGE


mercredi 19 mars 2025

 PAINT SHOP PRO 

MY TRANSLATIONS

AUTOMN


This tutorial is a personal creation from Valérie Savary, better known as

valyscrappassion.com


I have her written authorization to translate her tutorials in english and you can find the original here. Any resemblance with another one would be only pure coincidence. It is strictly forbidden to modify tubes, to change their name or take off the matermarks, to present them on your sites or blog, to share them in groups, 
to make a bank of images or to use them on lucrative purposes. Thank you to respect Valérie’s work and other artwork creators'work.

Don’t hesitate to warn me if you have any trouble with this translation
and I’ll try to fix the problem as quickly as I can.  You can reach me at here.

This tutorial was made in 2015 with an earlier PSP version.  I have used PSPX5 to make my translation; you can follow this tutorial with any other versions of PSP, but the result might be slightly different.

Download the zip file containing the materials, decompress and copy the originals; work with the copies.  For presets, double-click on them and they will install themselves. For gradients, masks, selections, textures, simply place in your appropriate PSP folder.


Let's go!

 Filters used in this tutorial
Mura'S Meister - Copies
Penta.com - Jeans
Toadies - What are you?
In Filters Unlimited 2:
&<Bkg Kaleidoscope> Tiler
Paper Textures - Canvas - Fine

Colors
Foreground color 1 #dec3a0
Background color 2 #5b5419
Color 3 #55433f
Color 4 #e56232


Prepare a foreground-background radial gradient with these settings:


 1
From the Materials, open the file 'Alpha-AutomN-VSP.pspimage', Window - duplicate
and fill your duplicate with the gradient just created. 
Close the original alpha pspimage.
Back to your image,
Effects - Plugins - Filters Unlimited 2 - &<Bkg Kaleidoscope> - Tiler at default settings


Note from the translator: as a precaution, save your duplicate alpha pspimage file in case something happens and remember to save often while making the tutorial.

 2
Layer - Duplicate
Image - Rotation free - Right - 90°

Edit - Cut
Selection - Select all
Paste into the selection
Selection - Deselect
Layers - Properties - Opacity at 50
Layers - Merge - Merge down

3
Layers - Duplicate
Effects - Geometric effects - Skew - 45 - Transparent

Layer - Properties - Opacity at 50
Effects - Textures - Blinds with color 3 #55433f with these settings:


Effects - Edge effects - Enhance
Highlight Raster 1
Effects - Plugins - Filters Unlimited 2 - Paper textures - Canvas Fine with intensity at 132


4
Highlight the top layer (Copy of raster 1)
Layers - New Raster Layer
Selections - Load/Save Selection - Load Selection From Alpha channel - Sélection #1


Flood Fill the selection with color 3 #55433f
(zoom into your image for a better view)
Selections - Select none
Effects - Plugins - Mura's Filter Meister - Copies with these settings:


Effects - Distortion Effects - Wave with these settings:

Effects - Image Effects - Offset

Effects - Plugins - Toadies - What are you?.. with these settings:

Effects - Plugins - Penta.com - Jeans with default settings:


 5
Layers - New Raster Layer
Flood Fill with color 3 #55433f
Layers - Load/Save Mask - Load Mask From Alpha Channel


 and select Masque #1


Layers - Merge - Merge Group
Repeat Effects - Plugins - Penta.com - Jeans as before
Effects - Image Effects - Seamless tiling

Layers - Properties - Opacity at 80

6
Highlight the 2nd layer (Copy of raster 1)


 Layers - Merge - Merge down
Selections - Load/Save Selections - Load Selection From Alpha channel - Sélection #2

Selections - Promote Selection to Raster
Selections - Select None
Effects - Distortion Effects - Spiky Halo with these settings:

Layers - Duplicate
Image - Mirror - Horizontal Mirror (the old Mirror)
Selections - Load/Save Selections - Load Selection From Alpha channel - Sélection #3

Edit - Cut (or your Delete key)
Selection - Select None

7
Highlight the top raster (Group - Raster 3)
From the materials, open the tube 'leeloo_echi_wallpaper_cry.pspimage'
Copy/Paste the tube in your image as a new layer
Image - Horizontal Mirror (the old version of Mirror)
Objects - Align - Left
Objects - Align - Bottom
Effects - 3D effects - Drop Shadow with these settings:


8
From the materials, open the tube 'leeloo_echi_wallpaper_cry_b.pspimage'
Copy/Paste the tube in your image as a new layer
Objects - Align - Right
Objects - Align - Bottom

 9
From the materials, open the tube 'leeloo_echi_wallpaper_cry_a.pspimage'
Copy/Paste the tube in your image as a new layer
Image - Horizontal Mirror (the old mirror)
Effects - Image Effects - Offset with these settings:

Layers - Merge - Merge down
Effects - 3D Effects - Drop Shadow with the same settings as before

10
From the materials, open the tube 'leeloo_Fall_Forest_b.pspimage'
Copy/Paste the tube in your image as a new layer
Image - Resize at 60% uncheck 'Resize All Layers'
Objects - Align - Bottom
Effects - 3D effects - Drop Shadow with the same settings as before

11
From the materials, open the tube 'deco1_VSP.pspimage'
Copy/Paste tje tube in your image as a new layer
Image - Image Effects - Offset


 12
From the materials, open the tube 'Texte-VSP.pspimage'
Copy/Paste in your image as a new layer
Image - Resize at 60% uncheck 'Resize All Layers'
Image - Negative Image
Layers - Properties - Opacity at 70

13
Image - Add borders - 1 px with color 4 #e56232
Image - Add orders - 2 px with color 3 #55433f
Image - Add borders - 1 px with color 4 #e56232
Selections - Select All
Add Borders - color 2 #5b5419 - uncheck 'Symmetric' with these settings:

Selections - Invert
Effects - Plugins - Filters Unlimited 2 - Paper textures - Canvas Fine with these settings:


Effects - Plugins - Toadies - What are you...


14
Layer - Promote Background Layer
Selections - Invest
Edit - Cut
Edit - Paste as a New Layer
Selections - Select None
Effects - 3D Effects - Drop Shadow with same settings as before:


 15
From the materials, open the tube 'deco2_VSP.pspimage'
Copy/Paste in your image as a new layer
Layer - Arrange - Move down
Image - Add borders of 1 px with color 3 #55433f

 16
Sign and save as a jpg or File - Export as an optimized jpeg file 

Valérie has a gallery of all the results that she receives from all over the world and she loves to see your creations. Click here to send yours!!

BACK TO PSP INDEX

 PAINT SHOP PRO

MY TRANSLATIONS

ACIDULÉ


This tutorial is a personal creation from Valérie Savary,
better known as valyscrappassion.com.


I have her written authorization to translate her tutorials and you can find the original here.  Any resemblance with another one would be only pure coincidence.  It is strictly forbidden to modify tubes, to change their name or take off the watermarks, to present them on your sites or blog, to share them in groups, to make a bank of images or to use them on lucrative purposes.

Thank you to respect Valérie’s work and other artwork creators'work.  Don’t hesitate to warn me if you have any trouble with this translation and I’ll try to fix the problem as quickly as I can.  You can reach me at here.

This tutorial was made on April 5, 2014, with an earlier PSP version.  I  have used PSPX5 to make my translation; you can follow this tutorial with any other versions of PSP, but the result might be slightly different.

Download the zip file containing the materials, decompress, copy the originals and close them. Work with the copies.  For fonts and presets, double-click on them and they will install themselves.

For gradients, masks, selections, textures, etc, simply place in your appropriate PSP folders.


 Filters used
Tramages - Wood grain
Simple - Diamond
Alien Skin Xenofex 2 - Electrify
Graphics Plus - Cross shadow

The colors
Color 1 #ff9500
Color 2 #f7f3ec
Color 3 #fdec6a


1
Open the tubes, make duplicates and close the originals.


2
Open a transparent image of 650 x 500 pixels
Prepare a radial gradient with your foreground/background colors #f7f3ec and #fdec6a, Angle at 315 with 3 repetitions

Flood fill your image with this gradient

3
Effects - Plugins - Tramages - Wood grain with these settings: 123/104/145/206/18/94

4
Effects - Plugins - Simple - Diamonds
Effects - Edge effects - Enhance more

5
Layers - New layer
Flood fill with color #ff9500
Layers - New Mask layer - From an image and select mask 'mask65'
Layers - Merge - Merge group
Properties - Blend mode - Select Luminance

6
Layers - New raster layer
Selections - Load/Save selection from disk - Select selection 'vsp3'
Flood fill with a linear gradient with foreground color #fdec6a and background color #ff9500
Angle at 45 and 2 repeats
Properties - Opacity at 70

7
Effects - Plugins - Alien Skin Xenofex 2 - Electrify with these settings: 12/29/40/50/50/50
Selections - Select none

8
Layers - Duplicate
Image - Mirror
Layers Merge down
Effects - 3D effects  - Drop shadow 1/1/70/10 with color black

9
Resize the woman tube that you duplicated twice at 75%
Edit - Copy - Edit - Paste as a new layer raster
Place the tube in the middle of the image as shown in the tutorial image
Effects - 3D effects - Drop Shadow 10/10/50/30 with color black
Layers - Merge - Merge visible

10
Image - Add symmetric borders of 5 pixels with color #ff9500
With your Magic wand, select this border
Effects - Plugins - Graphic Plus - Cross shadow with these settings:
92 / 154 / 179 / 136 / 156 / 71 / 92 / 143

11
Selections - Invert
Effects - 3D effects - Drop Shadow at 3/3/50/3 with color black
Repeat the drop shadow effect with its negative settings -3-3/50/3
Selections - Select none

12
Image - Add symmetric borders of 40 pixels with color #ff9500
With your Magic wand Tolerance 0 and Opacity 0, select this border
Effects - Texture effects - Mosaic - Glass with these settings:
73 / 73 / 49 / 15 / 2 / 40
Selections - Select none

13
Image - Add symmetric borders of 10 pixels with color #f7f3ec
With your Magic wand Tolerance 0 and Opacity at 0, select this border
Effects - Texture effects - Blinds with these settings:
14 / 40 uncheck horizontal and color #ff9500
Repeat the same effect with horizontal checked
Selections - Invert
Effects - 3D effect - Drop shadow with these settings:
3 / 3 / 50 / 3 with color black

and repeat with its negative settings:  -3/-3/50/3 with color black
Selections - Select none

14
With your Text tool, select the font DC hibiscus furnished in the Materials - Size 28 - Bold - Color #fdec6a
Place it in the middle at the bottom of the image as
shown in the tutorial image
Effects - 3D effects - Drop Shadow 0/13/50/10 with color black

15
Open the tube 'coin' and Copy/Paste it as a new layer
Move it in the upper left corner
Layers - Duplicate
Image - Mirror
Layers - Merge - Merge down
Layers - Duplicate
Image - Flip
Layers - Merge - Merge down
Effects - 3D effects - Drop Shadow with these settings: 
3 / 3 / 55 / 6 with color black
Layers - Merge - Merge all (Flatten)
Adjust - Sharpness - Sharpen

16
Sign your image and save it as a jpg
or File - Export - As an optimized jpg file

 I hope that you had a great time making this tutorial.
Valérie has a gallery of all the results that she receives from all over
the world and she loves to see your creations. Click here to send yours!!


dimanche 15 septembre 2019

Hier, c'était la foire d'Havelock et j'avais un petit kiosque. Voici une photo avec mes petits ouvrages à vendre:
Je n'ai pas vendu autant que j'aurais voulu... Qu'est-ce que je vais faire maintenant avec 6 ou 7 petites poupées... La dame dans le 2e kiosque après moi avait des poupées en tissu.. 2 fois moins chères que les miennes. Devinez qui en a le plus vendu!!?? L'artisanat se vend très mal... il faut quasiment donner les travaux parce que le temps mis à les faire n'est jamais tenu en ligne de compte.
Mais en général, tout de même, j'ai adoré ma journée et j'ai fait de très belles rencontres. Je répèterai l'expérience l'an prochain mais je vendrai plutôt mes violettes africaines!!!

lundi 2 septembre 2019

Mes petits muffins kéto et mon caramel kéto!
J'ai perdu quelques livres avec cette diète et je veux conserver certaines recettes que j'aime beaucoup.
Premièrement, les gaufres: en anglais, ils appellent çà des 'chaffles'. Dans un petit bol, on met un peu de farine d'amandes, du fromage mozzarella râpé, un oeuf battu; on verse dans le gaufrier puis on rajoute du fromage mozzarella par-dessus. On attend que la gaufre soit cuite jusqu'à ce que la lumière nous indique que la gaufre est cuite. Cette gaufre peut servir de base pour nos hamburgers, sandwhichs chauds ou froids; c'est un excellent petit déjeûner également et on peut y ajouter bacon, jambon, saucisses ou assaisonner avec de la cannelle etc.
Mais revenons aux muffins. Voici les ingrédients:
Muffins
2-1/2 tasses de farine d'amande
1/2 tasse stévia granulé
1-1/2 c. thé poudre à pâte Magic
1/4 c. thé sel
1/3 tasse beurre salé
1/3 tasse  crème 35%
1/3 tasse d'eau tiède + 1 enveloppe de gélatine Knox
3 gros oeufs
1/2 c. thé extrait de vanille

Faites tremper la gélatine dans l'eau tiède. Préchauffez le four à 350°F.
Doublez vos moules à petits-gâteaux avec des moules en papier.
Dans votre robot culinaire, mettez les ingrédients secs, pulsez 2 sec puis ajoutez le beurre fondu, la crème, la gélatine préparée, les oeufs et l'extrait de vanille.
Distribuez la pâte également aux 2/3 de chaque moule. Enfournez et cuisez au milieu du four pendant 20 à 25 min ou jusqu'à ce qu'un cure-dent ressorte propre et que le dessus soit doré.

A cette recette, on peut
-ajouter des épices (cannelle et muscade) pour une saveur d'automne;
-au lieu de la vanille, mettez de l'essence d'orange ou de citron avec leur zeste et ajoutez des graines de pavot dans le mélange avant d'enfourner;
-pour une saveur d'érable, remplacez la vanille par de l'essence d'érable;
-pour une touche sucrée, versez du caramel kéto par-dessus les muffins cuits.

Pour le caramel maintenant:

         1/3 tasse beurre salé
         1/3 tasse Swerve cassonade
         1 tasse de crème épaisse 35%
         1 petit bouchon d'extrait de vanille
         Dans une petite casserole, mettez le beurre, le Swerve cassonade et la crème. Sur un feu moyen à fort, amenez à ébullition en brassant constamment et comptez 3 min à partir de ce moment. Dès que les 3 min sont écoulées, enlevez la casserole du feu, ajoutez la vanille puis versez dans un contenant de verre épais style Mason ou Bernardin. N'y goutez pas tout de suite car c'est très chaud et vous pourriez vous brûler. Ce caramel contient zéro gr glucides.