

This tutorial is a personal creation from Valérie Savary, better known as valyscrappassion.com. You can find the original here. Any resemblance with another one would be only pure coincidence. It is strictly forbidden to modify tubes, to change their name or take off the watermarks, to present them on your sites or blog, to share them in groups, to make a bank of images or to use them on lucrative purposes.
Thank you to respect Valérie’s work and other creators' work mentioned in the original tutorial. Don’t hesitate to warn me if you have any trouble with this translation and I’ll try to fix the problem as quickly as I can. You can reach me here.
This tutorial was made on April 11, 2014, with an earlier PSP version. I have used PSPX5 to make my translation; you can follow this tutorial with any other versions of PSP, but the result might be slightly different.

Download the zip file
containing the materials, decompress and copy the originals; work with the copies. For presets, double-click on them and they
will install themselves. For gradients, masks,
selections, textures, etc, simply place in your appropriate PSP folders.
Plugins
AAA filters - Foto frame
Graphic Plus - Cross shadow
Jeux de lignes
Colors
Foreground #e6ddd6
Background #d0c5bc
1
Open the tubes, make
duplicates and close the originals. Always work on the copies; you could need the original intact later on...
2
Open a new transparent file
of 800 x 650 pixels
3
Flood fill with a halo
gradient with 3 repeats, uncheck Invert

4
Effects - Plugins - Jeux de
lignes - Entrelacement with these settings
5
Layers - New raster layer -
Flood fill with black
6
From the materials, open the
mask image '11mask2' and minimize; back to your work,
Layers - New mask layer -
Load from picture '11mask2', check 'Invert mask data' and 'Source luminance'

Layers - Merge - Merge group
Selections - Load/Save a selection from disk and select 'Shalimar VSP1'

8
Effects - Plugins - AAA
Filters - Foto frame with these settings
Selections - Promote
selection to layer
Selections - Select none
Effects - 3D effects - Drop
Shadow 3/3/30/5
Repeat the Drop Shadow
effect with its negative settings: -3/-3/30/5
9
Layer - New raster layer
Selections - Load/Save from
the disk and select 'Shalimar VSP2'
Selections - Modify -
Contract by 12 px
Modify your colors: Foreground color #e6ddd6 and Background
#d9c5bc
Flood fill with radial gradient - Angle 315
and 10 repeats
10
Effects - Texture effects - Mosaic - Glass with
these settings:
11
Layers - New raster layer
Selections - Load/Save from
disk and select 'Shalimar VSP3'
Change your colors for
Foreground #e6ddd6 and Background #000000
Flood fill with the gradient resulting from these
colors Angle 325 and 10 Repeats
Effects - 3D effects - Drop
Shadow with these settings: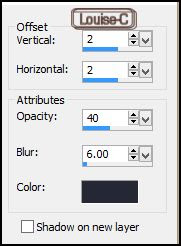
Selections - Select none
Copy/Paste as a new layer the image 'shalimar.png' and place at the bottom as shown in the final result
Layers - Duplicate
Resize at 110 - Opacity of this layer at 30
Place this duplicate on the left of your work
Back to the first layer of the perfume original tube
Layers - Duplicate
Resize at 120 - Opacity of this layer at 30
Place this duplicate at the top of your work
Back to the first layer of the original tube
Layers - Bring to top
Effects - 3D effects - Drop Shadow 7/7/60/40 with black

15
Copy/Paste as a new layer
the woman tube 'Maya1.pspimage'
Image - Resize at 85% -
uncheck 'Resize all layers'
Place to the right of your
work
Effects - 3D effects - Drop
Shadow
16
Click on your Text tool -
Font Copper Alt Caps Expert, size 30, Stroke width at 5, vector with color black in both Foreground and Background
Write your text
(Note from the translator:
after writing 'Shalimar', I thought that the letters were too 'thick' so I
reduced the Stroke width to 2)
After clicking on the
checkmark icon to apply the changes,
Click on any other tool that
will free the text from being a vector
17
Image - Free rotation - 15
to the left
Place it to your liking
Effects - 3D effects - Drop
shadow 5/5/60/10

Repeat the Drop shadow effect a second time
18
Image - Add symmetric
borders of 5 px with color #d9c5bc
19
Image - Add symmetric
borders of 15 px with color #e6ddd6
With your Magic wand (Match mode at Color, Tolerance
and Feather at 0), select this color border
Foreground #e6ddd6 and Background #d9c5bc
Angle 147 and 3 repeats

20
Effects -
Plugins - Graphics Plus - Cross shadow with default settings
Effects - 3D effects - Drop
shadow
Repeat the Drop shadow effect with its negatives
Selection - Select none
21
Image - Add symmetric
borders of 5 px color #d9c5bc
With the Magic wand with the
same settings, select this border
Effects - 3D effects - Drop
shadow
and repeat the Drop
Shadow with the negative values
Selections - Select none
22
Sign and save as a jpg or
File - Export - As an optimized jpeg file
I hope that you enjoyed
making this tutorial.
Valérie has a gallery of all
the results that she receives
from all over the world and
she loves to see your creations and include
them in her gallery. Click here to send yours!!
Aucun commentaire:
Enregistrer un commentaire