PAINT SHOP PRO
MY TRANSLATIONS
DREAM DAY
My translation of a tutorial Valérie Savary, better known as
I have her written permission to translate her tutorials in english and you can find the original here. Any resemblance with another one would be only pure coincidence. It is strictly forbidden to modify tubes, to change their names or take off
the watermarks, to present them on your sites or blog, to share them in
groups, to make a bank of images or to use them on lucrative purposes.
Thank you to respect Valérie’s work and other artwork creators'work mentioned in the original tutorial. Don’t hesitate to warn me if
you have any trouble with this translation and I’ll try to fix the
problem as quickly as I can. You can reach me here.
Valérie made this tutorial on April 16, 2015. I have used PSPX5 to make my translation; you can follow this tutorial
with any other versions of PSP, but the result might be slightly
different.
Materials
1 calque alpha
1 palette de couleurs
1 masque de Tine
1 script
6 tubes persos
Plugins
Carolaine and Sensibility, CS-LDots
VanDerLee, UnPlugged-X
In Filters Unlimited 2.0:
Lens Flares, Flare 06
Render, Clouds
VM Toolbox, Trimosaic
Colors
Foreground color 1 #e7f3cb
Background color 2 #658829
Additional color 3 #f6faec
Additional color black
Preparation
Open the alpha channel image and tubes, make duplicates and close the
originals. Always work on your duplicates to preserve the originals.
Copy/Save the mask in your 'My PSP Files' under the Masks folder.
Double-click on the presets and they will install themselves.
With your Foreground and Background colors in the Materials, prepare a Foreground/Background rectangular gradient as
follows:
1
Open the alpha channel 'Alpha-DreamDay-VSP' and duplicate it
(if you have not done so yet as mentioned in Preparation)
Flood fill with the gradient above
Effects - Image effects - Seamless tiling with default settings
Adjust - Blur - Gaussian blur at 25
Effects - Plugins - <I.C.NET Software> Filters Unlimited 2.0 - VM Toolbox - Trimosaic
2
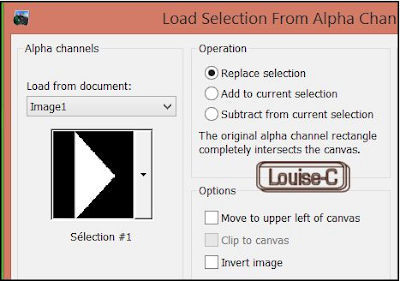
Selections - Load/Save a selection from the alpha channel and select
'Sélection#1'
Selections - Promote selection to layer
Selections - Select none
Effects - Plugins - <I.C.NET Software> Filters Unlimited 2.0 - Lens
Flares - Flare 06
Adjust - Sharpness - Sharpen
3
Highlight the bottom layer
Selections - Load/Save a selection from the alpha channel and select
'Sélection#2'
Selections - Promote selection to layer
Selections - Select none
Layers - Duplicate
Activate the lower layer like this:
Effects - Plugins - VanDerLee - UnPlugged-X - Vertical tile
Now, activate the layer above it
Effects - Plugins - VanDerLee - UnPlugged-X - Distortion
4
Highlight the bottom layer
Load/Save from the alpha channel and select 'Sélection#3'
Selections - Promote selection to layer
Selections - Select none
With Foreground and Background colors selected
Effects - Plugins - <I.C.NET Software> Filters Unlimited 2.0 -
Render - Clouds with default settings
Adjust - Sharpness - Sharpen
5
Highlight the bottom layer
Load/Save Selection from alpha channel and select 'Sélection #4
Selections - Promote selection to layer
Selections - Select none
Effects - Plugins - Carolaine and Sensibility - CS-LDots
6
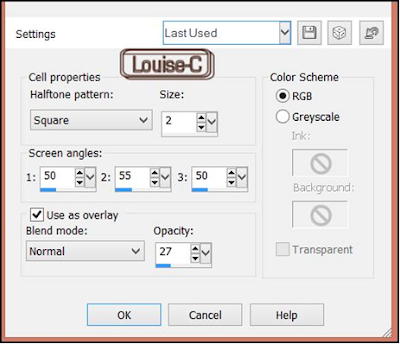
Highlight the bottom layer
Effects - Artistic effects - Halftone
Your layers palette should look like this:
Layers - Merge - Merge visible
7
Layers - New raster layer
Flood fill with the color 3 #f6faec
Layers - New mask layer from image and open 'creation.tine_masque144'
Invert mask data unchecked
Layers - Merge - Merge group
Adjust - Sharpness - Sharpen
Opacity of this layer set at 70%
8
Open/Copy as a new layer the tube 'deco1-DreamdayVSP'
(erase the signature)
Modify the Blend mode properties for this layer at Luminance legacy
Open/Copy as a new layer the tube 'deco2-DreamdayVSP'
Effects - Image effects - Offset Hor 244 and Vert at 0
Modify the Blend mode properties for this layer at Luminance legacy
Effects - 3D effects - Drop shadow 0 / 0 / 100 / 10 with color 2 #658829
9
Open/Copy as a new layer the tube 'VSP-tubenature-001'
(erase the signature)
Image - Resize at 62% unchecking 'Resize all layers'
Effets - Image effects - Offset with Hor at -222 and Vert at 0
Adjust - Sharpness - Sharpen
Opacity of this layer at 70%
10
File - Script - Run the script 'Script-DreamDay-VSP'
(you can change your colors and the size of the border, if needed, then OK)
You could also 'Start recording' this script.
If this is the case, click on 'Start recording' (see above picture, below
the 'Run' column) and from now on, everything that you will do will be part of your script;
just follow the following settings
Image - Add symmetrical borders of 2 px with color #658829
Image - Add symmetrical borders of 10 px with color #f6faec
Image - Add symmetrical borders of 2 px with color #658829
Selections - Selection none
Image - Add symmetrical borders of 50 px with color #f6faec
Selections - Invert
Image - Add symmetrical borders of 2 px with color #658829
The selection stays on at the end of the script
Open/Copy in the selection the tube 'CadreVSP'
If you used your colors, use the Change to target tool
Selections - Select none (that ends the script)
11
Open/Copy as a new layer the tube 'titre-DreamDayVSP'
Place to the right, as shown in the final result
12
Open/Copy as a new layer the tube 'deco3-DreamDayVSP'
(erase the signature)
It is placed as it should
Layers - Merge - Merge (Flatten)
13
Image - Resize at a width of 900 px
Adjust - Sharpness - High Pass Sharpen
14
Sign and save as a jpg or File - Export as an optimized jpeg file.
We are done!!
I hope that you enjoyed making this tutorial.
Valérie has a gallery of all the results that she receives
from all over the world and she loves to see your creations and include
them in her gallery. Click here to send yours!!