
Back to PSP index My Tutorials My Translations My Banners

This tutorial is a
personal creation from Valérie Savary, better known as
I have her written authorization to translate her tutorials in english and you can find the original here. Any resemblance with another one would be only pure coincidence. It is strictly forbidden to modify tubes, to change their name or take off the
matermarks, to present them on your sites or blog, to share them in groups, to make a bank of images
or to use them on lucrative purposes. Thank you to respect Valérie’s work and other artwork creators'work.
Don’t hesitate to warn me if you have any trouble with this translation
and I’ll try to fix the problem as quickly as I can. You can reach me at here.
This tutorial was made in
2015 with an earlier PSP version. I have
used PSPX5 to make my translation; you can follow this tutorial with any other versions of PSP, but the result
might be slightly different.
Download the zip file containing the materials, decompress and copy the originals; work with the copies. For presets, double-click on them and they will install themselves. For gradients, masks, selections, textures, simply place in your appropriate PSP folder.

Let's go!
Mura'S
Meister - Copies
Penta.com - Jeans
Toadies - What are you?
In Filters Unlimited 2:
&<Bkg Kaleidoscope> Tiler
Paper Textures - Canvas - Fine
Colors
Foreground color 1 #dec3a0
Background color 2 #5b5419
Color 3 #55433f
Color 4 #e56232
Prepare a
foreground-background radial gradient with these settings:

From the Materials, open the file
'Alpha-AutomN-VSP.pspimage', Window - duplicate
and fill your duplicate with the gradient just
created.
Close the original alpha
pspimage.
Back to your image,
Effects - Plugins - Filters
Unlimited 2 - &<Bkg Kaleidoscope> -
Tiler at default settings

Layer - Duplicate
Image - Rotation free - Right - 90°

Edit - Cut
Selection - Select all
Paste into the selection
Selection - Deselect
Layers - Properties - Opacity at 50
Layers - Merge - Merge down
3
Layers - Duplicate
Effects - Geometric effects - Skew - 45 -
Transparent

Layer - Properties - Opacity at 50
Effects - Textures - Blinds with color 3 #55433f
with these settings:

Highlight Raster 1
Effects - Plugins - Filters Unlimited 2 - Paper textures - Canvas Fine with intensity at 132

4
Highlight the top layer (Copy of raster 1)
Layers - New Raster Layer
Selections - Load/Save Selection - Load Selection
From Alpha channel - Sélection #1

Flood Fill the selection with color 3 #55433f
(zoom into your image for a better view)
Selections - Select none
Effects - Plugins - Mura's Filter Meister - Copies
with these settings:

Effects - Distortion Effects - Wave with these settings:

Effects - Image Effects - Offset

Effects - Plugins - Toadies - What are you?.. with
these settings:

Effects - Plugins - Penta.com - Jeans with default settings:

Flood Fill with color 3 #55433f
Layers - Load/Save Mask - Load Mask From Alpha
Channel


Repeat Effects - Plugins - Penta.com - Jeans as before
Effects - Image Effects - Seamless tiling

Layers - Properties - Opacity at 80
6
Highlight the 2nd layer (Copy of raster 1)

Selections - Load/Save Selections - Load Selection
From Alpha channel - Sélection #2

Selections - Promote Selection to Raster
Selections - Select None
Effects - Distortion Effects - Spiky Halo with
these settings:

Layers - Duplicate
Image - Mirror - Horizontal Mirror (the old Mirror)
Selections - Load/Save Selections - Load Selection From
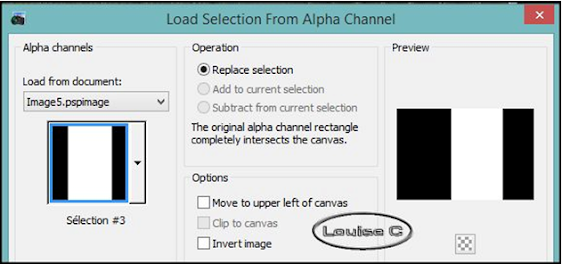
Alpha channel - Sélection #3
Edit - Cut (or your Delete key)
Selection - Select None
7
Highlight the top raster (Group - Raster 3)
From the materials, open the tube
'leeloo_echi_wallpaper_cry.pspimage'
Copy/Paste the tube in your image as a new layer
Image - Horizontal Mirror (the old version of
Mirror)
Objects - Align - Left
Objects - Align - Bottom
Effects - 3D effects - Drop Shadow with these
settings:

8
From the materials, open the tube
'leeloo_echi_wallpaper_cry_b.pspimage'
Copy/Paste the tube in your image as a new layer
Objects - Align - Right
Objects - Align - Bottom
From the materials, open the tube
'leeloo_echi_wallpaper_cry_a.pspimage'
Copy/Paste the tube in your image as a new layer
Image - Horizontal Mirror (the old mirror)
Effects - Image Effects - Offset with these
settings:

Layers - Merge - Merge down
Effects - 3D Effects - Drop Shadow with the same
settings as before
10
From the materials, open the tube
'leeloo_Fall_Forest_b.pspimage'
Copy/Paste the tube in your image as a new layer
Image - Resize at 60% uncheck 'Resize All Layers'
Objects - Align - Bottom
Effects - 3D effects - Drop Shadow with the same
settings as before
11
From the materials, open the tube
'deco1_VSP.pspimage'
Copy/Paste tje tube in your image as a new layer
Image - Image Effects - Offset

From the materials, open the tube
'Texte-VSP.pspimage'
Copy/Paste in your image as a new layer
Image - Resize at 60% uncheck 'Resize All Layers'
Image - Negative Image
Layers - Properties - Opacity at 70
13
Image - Add borders - 1 px with color 4 #e56232
Image - Add orders - 2 px with color 3 #55433f
Image - Add borders - 1 px with color 4 #e56232
Selections - Select All
Add Borders - color 2 #5b5419 - uncheck 'Symmetric'
with these settings:

Selections - Invert
Effects - Plugins - Filters Unlimited 2 - Paper
textures - Canvas Fine with these settings:


14
Layer - Promote Background Layer
Selections - Invest
Edit - Cut
Edit - Paste as a New Layer
Selections - Select None
Effects - 3D Effects - Drop Shadow with same
settings as before:

From the materials, open the tube
'deco2_VSP.pspimage'
Copy/Paste in your image as a new layer
Layer - Arrange - Move down
Image - Add borders of 1 px with color 3 #55433f
Sign and save as a jpg or File - Export as an
optimized jpeg file
Valérie has a gallery of all the results that she receives from all over the world and she loves to see your creations. Click here to send yours!!


