BACK TO PSP INDEX MY TUTORIALS MY TRANSLATIONS MY BANNERS

This tutorial is a personal
creation. Any resemblance with another
one would be only pure coincidence. It is strictly forbidden to modify my images, to change their name or take off
the watermarks in order to present them on your sites or blog, to share them in groups, to make a bank of images, or to use them on lucrative purposes.
I have made this tutorial with PSPX on March 26, 2024. Thank you to respect my work
and the creators work. Don’t hesitate to write to me here
if you have any trouble with this tutorial and I’ll try to fix the problem as quickly as I can. Decompress the zipped
Materials file, open the files and save them in their respective My PSP
files folder.
For png and other images,
duplicate them after taking away my watermark. Work with your duplicates to
preserve originals. Open the masks and minimize them to tray. Copy/Paste the gradient into
your PSP files in the Gradients folder. Double-click on the font,
click on Install and it will install itself in its right place. Double-click on the preset and it will be saved automatically in its right
place.
Save your work often as
pspimage with all your layers just in case your PSP crashes!!
Materials
4 png images originally made
as jpg by me with Image
Creator from Bing
1 selection
2 Alien Skin Eye Candy
presets
1 mask
Plugins
Photo tools
Alien Skin Eye Candy 5
Impact
Mura Meister's Perspective
tiling
VM Exravaganza - Vasarely
Some of these plugins could
be in I.E. Net Software - Unlimited Filters 2.0
Colors
Foreground color gray
#666564
Background color pink
#dea8b8
Accent color dark pink
#d74671
Let's begin!
1
Create a new transparent
image of 900 x 700 px
With your colors already
designed in your Materials,
select a radial gradient #1
Foreground-Background
Angle 0 and 2 repeats
Flood fill
your new image with this gradient
2
Selections -
Open/Load from disk - Select selection 'barbie-selection'
Flood fill
this selection with the Background color #dea8b8
Selections
- Select none
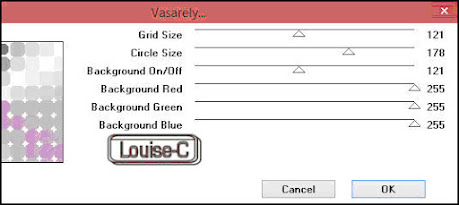
Effects -
Plugins - VM Extravaganza - Vasarely
Effects -
Texture effects - Mosaic - Antique

3
Layers -Duplicate
Effects -
Plugins - Mura's Meister - Perspective tiling

Effects - Plugins - Alien
Skin Eye Candy Impact - Perspective shadow
4
Layers -
New raster layer
Flood fill
with Background color #dea8b8
Layers - New
mask layer from disk and add 'Narah_Mask_0473-reverse'

Layers -
Merge - Merge group
Effects -
3D effects - Drop shadow 1 / 1 / 100 / 5 with black

Layers -
Merge visible
5
Copy/Paste
as a new layer your duplicate of 'lc-barbie'
Adjust -
Sharpness - Sharpen
Effects -
Image effects - Offset

Effects -
Plugins - Alien Skin Eye Candy 5 - Impact - Perspective shadow
Select the
preset 'lc-barbie-girl'
and if you could not save the preset, here are the settings: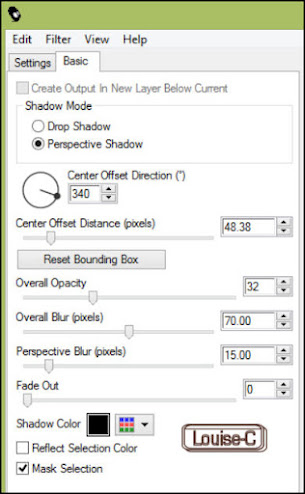
6
Layers -
New raster Layer
With your
Text tool, select a nice font to write your compliment to Barbie
I selected
Curlz because I think that everybody has it. If not, you can
download it here.
Make sure
that both your Foreground and Background
colors is
the accent color #d74671
Effects - 3D effects - Inner bevel with color #d74671

Effects -
3D effects - Drop Shadow

7
Note: I
have already made a script of this step because it is used very often; if you want
to make a script too, start it HERE
Image - Add
borders - 2 px color black
2 px color
#dea8b8
2 px color
black
2 px color
#dea8b8
2 px color
black
35 px color
#dea8b8
End it HERE.
8
With your
Magic wand, select the 35 px border
Effects -
Plugins - Photo Tools - Frosted edges color
(this
filter could be under your Filters Unlimited 2)
with the settings 73 / 204 / 204 / 40 / 60

Effects - Texture effects -
Straw Wall with these settings and color black
Effects -
3D effects - Cutout

Selections
- Select none
9
Image -
Resize to 80%
Image - Add
symmetric borders of 50 px with color #dea8b8
With your
Magic wand, select that border
Effects -
Texture effects - Weave and enter these settings
with weave
Background color#dea8b8
and Gap
Accent color #d74671

Effects -
Alien Skin Eye Candy Impact 5 - Bevel,
using the preset 'lc-barbie-cadre'
and if you could not install the preset, here are the settings:

Selections
- Select none
10
Copy/Paste
as a new layer your duplicate of 'lc-barbie-rose-big'
Image -
Resize at 65% - 'Resize all layers' unchecked
Adjust -
Sharpness - Sharpen
With your
Move tool, place the rose bouquet at the bottom left corner
as shown in
the final result
11
Copy/Paste
as a new layer your duplicate of 'lc-barbie-rose-small'
Image -
Resize at 65% - 'Resize all layers' unchecked
Adjust -
Sharpness - Sharpen
With your
Move tool, place the flower at the bottom right corner
as shown in
the final result
12
Copy/Paste
as a new layer your duplicate of 'lc-barbie-rosebuds'
Adjust -
Sharpness - Sharpen
With your
Move tool, place the buds at the top right corner
as shown in
the final result
13
Layers -
Merge - Merge down twice
(or take
out the visibility of the bottom layer and Layers - Merge - Merge visible)
Effects -
User defined filter - Emboss_3
Note: if you do not have this filter yet, here are the settings:

Effects -
3D effects - Drop Shadow with the same settings as previously
Layers -
Merge - Merge all (Flatten)
14
Sign and
save as a jpg or File - Export as an optimized jpeg
That's it,
we are done!! I hope that
you enjoyed making this tutorial as much as I had fun making it! Send me here your creation and I will gladly
add it in my gallery! MY TUTORIALS
MY TRANSLATIONS
MY BANNERS


