mercredi 9 avril 2025

Paint Shop Pro - My tutorials - Irish Queen

BACK TO PSP INDEX   MY TUTORIALS   MY TRANSLATIONS    MY BANNERS


This tutorial is a personal creation.
Any resemblance with another one would be only pure coincidence.
It is strictly forbidden to modify my images, to change their name or take off the watermarks, 
to present them on your sites or blog, to share them in groups, to make a bank of images, or to use them on lucrative purposes.

I have made this tutorial with PSPX5 on February 14, 2024. Thank you to respect my work and the creators work. Don’t hesitate to write to me here if you have any trouble with this tutorial and I’ll try to fix the problem as quickly as I can.

Decompress the zipped Materials file, open the files and save them in your My PSP files folder. For png and other images, duplicate them after taking away my watermark. Work with your duplicates to preserve originals. Open the masks and minimize them to tray. Copy/Paste selections into your My PSP files Selections folder. Double-click on the presets, if any, to install them and they will be saved automatically in their right place.

Save your work often as pspimage with all your layers just in case your PSP crashes!!


Materials
‘lc-irish-queen2’ made with Image Creator from Bing
‘lc-clover’ tubed by me
text tubed by me (optional)
2 masks: NarahsMasks_Nature1590 and Narah_mask_Nature016
Open the masks and minimize to tray

Plugins
Two Moon – Rotoblades
AAA Frames – Transparent frame
Alien Skin Eye Candy 5 – Impact – Perspective Shadow
Alien Skin Eye Candy 5 – Textures
Alien Skin Xenofex 2 – Stain

Colors
Foreground color #83a976
Background color #4f7463
Accent color #354f43

Make a new image of 900 X 700 pixels
With both background #4f7463 and foreground #83a976 colors,
make a #1 Foreground-Background Radial gradient
Angle 0 and Repeats 12 – Invert unchecked

Flood fill the image with this gradient


2
Selections – Select all
Open, Copy/Paste into the selection your duplicate of ‘lc-irish-queen’
(delete the watermark)
Adjust – Blur – Radial blur – check Zoom and Elliptical and these settings

Selections – Selection none

3
Layers – Duplicate
Image – Image Mirror
Image – Image Flip
 Effects – AAA Frame – Transparent frame of 30 – uncheck Stroke


Effects – Two moon – Rotoblades with default settings


Effects – Alien Skin Eye Candy 5 Impact – Perspective Shadow – Drop Shadow, Lowest

Layers – Merge – Merge down
Adjust – Sharpness – Sharpen

4
Layers – New raster layer
Flood fill with Background color #4f7463
Layers – New Mask Layer – from image and select ‘NarahsMasks_1590’

Layers – Merge – Merge group
Effects – User defined filter – Emboss_8

5
Layers – New raster layer
Flood fill with Accent color #354f43
Layers – New mask layer – Load/save from image ‘Narah_mask_Nature016’

Layers – Merge – Merge group
Effects – Alien Skin Eye Xenofex 2 – Stain
with Stain Color white

Image – Resize at 85%

6
Open, Copy/Paste as a new layer your duplicate of ‘lc-irish-queen-2’ (delete the watermark)
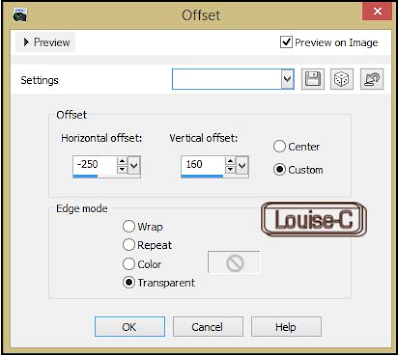
Effects – Image effects – Offset – Custom and Transparent checked
Horizontal 170 and Vertical -47

Effects – Alien Skin Eye Candy 5 – Perspective shadow
lowering the bottom offset direction at
the same bottom line as the image (see red arrow)

Layers – Merge – Merge down twice
You should have this

7
Layers – New raster layer
Flood fill with Foreground color #83a976
Selections – Load/Save selection ‘irish-queen-selection1’
Hit the delete key or Scissors
Layers – Arrange – Move down
Select none
Layers – Merge – Merge visible

8
With the Text tool and a font of your choice, write ‘Amhrán na bhFiann’,
which is the Irish national anthem or something irish of your choice
I used the JAHMAL font at size 26 (included it in the Materials)
with color #eaf4e9 in the foreground and the gradient made
at the beginning of the tutorial in the background

Omit the next Drop shadow steps if you use the text image in the Materials:
Effects – 3D effects – Drop shadow 3 / 3 / 100 / 41 with color black

Repeat the drop shadow once more.
With your Moving tool, place at the bottom of the image as shown in the final result

9
Copy/Paste your duplicate of ‘lc-clover1’
Image – Resize – uncheck ‘Resize all layers’ at 55%
Effects – Image effects – Offset

Effects – 3D effects – Drop Shadow

10
Image – Add symmetric borders of 80 px with whatever color is in the window
With your Magic wand (Tolerance and Feather at 0),
click in that border to select it
Effects – Plugins – Alien Skin Eye Candy 5 – Textures – Diamond plate
Basic settings and Color and Lighting settings as follows with Foreground color #83a976


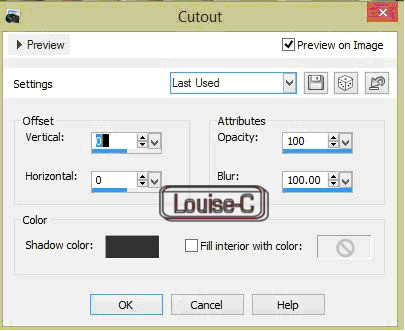
Effects – 3D effects – Cutout

Selections – Select none
Image – Add a border of 2 px black
Resize your image at width 900 px – the height will resize by itself

That is it, we are done!!
I hope that you enjoyed yourself making this simple tutorial and if
you make it and send it back to me here, I will be honored to include it in this page, below.


Paint Shop Pro - My tutorials - Dragonfly Queen

BACK TO PSP INDEX   MY TUTORIALS   MY TRANSLATIONS    MY BANNERS


This tutorial is a personal creation. Any resemblance with another one would be only pure coincidence. It is strictly forbidden to modify my images, to change their name or take off the watermarks in order to present them on your sites or blog, to share them in groups,
to make a bank of images, or to use them on lucrative purposes.

I have made this tutorial with PSPX5 on February 6, 2024. Thank you to respect my work and the creators work. Don’t hesitate to write to me here if you have any trouble with this tutorial and I’ll try to fix the problem as quickly as I can.


Decompress the zipped Materials file, open the files and save them in your My PSP files folder. For png and other images, duplicate them after taking away my watermark.
Work with your duplicates to preserve originals.
Open the masks and minimize them to tray.
Copy/Paste the gradient into your PSP files in the Gradients folder.
Double-click on the font, click on Install and it will install itself in its right place.
Double-click on the preset and it will be saved automatically in its right place.
Save your work often as pspimage with all your layers just in case your PSP crashes!!

Materials
Tubes made by me with Image Creator from Bing
4 png images
1 font
1 preset
1 mask

Plugins
VM Extravaganza – White lines
AP lines – Silverlining – Lines – Breaks in Fence
AAA Fotoframe – Frame Works
Filters Unlimited 2.0 – &<Bkg Designer sf1011 – Fan blades
Alien Skin Eye Candy 5: Impact – Perspective shadow

Colors
Foreground color #a9bdd9
Background color #323e4a
Accent color #7a90a4
Other color #8fadc3 (inner bevel)

Before starting the tutorial, minimize the mask and your duplicates of
the tubes in your workspace without my watermark.

Let’s begin!!!

1
Create a transparent new image 900 x 700 px
Flood fill it with this linear gradient
#1 Foreground-Background colors –  Angle 130 and 5 Repeats

2
Layers – New raster layer
F
lood fill with the Foreground color #a9bdd9
Layers – New mask layer
From image and select mask ‘lc-masque-libellule’ – check ‘Invert’


Layers – Merge – Merge group
Effects – User defined filter – Emboss_8
Layers – Merge – Merge all visible

3
Layers – New raster layer
Flood fill with the same gradient ‘lc-libellule’
Effects – Plugins – VM Extravaganza – White lines

(Save in Pspimage often in case you encounter some problems with your PSP)
Layers – Merge visible

4
Layers – New raster layer
Flood fill with the Accent color #7a90a4
Effects – Plugins – AP lines – Silverlining – Lines – Breaks in Fence by default

Layers – Arrange – Move down

5
On the top layer
Image – Resize at 85% uncheck ‘Resize all layers’
With your Magic wand (Tolerance and Feather at 0),
click in the border space just created to select it
Return to the bottom layer Effects – 3D effects – Inner bevel with these settings and the Other color #8fadc3

6
Selections – Invert
Highlight the top layer
Effects – Plugins – AAA Fotoframe – Frame Works
and only change the color (Blue Stain) and the type (Double 20)

You should have this now

Selections – Select none

7
Open, Copy/Paste as a new layer your duplicate of ‘frame3’
Effects – Filters Unlimited 2.0 – &<Bkg Designer sf1011 – Fan blades with default settings


Before merging everything (next step), save your image as a PSPimage so that you can return to it if you want to change something in the rasters, then
Layers – Merge – Merge visible

8
Copy/Paste your duplicate of the tube ‘dragonfly-queen’
Effects – Image effects – Offset


Effects – Plugins – Alien Skin Eye Candy 5: Impact – Perspective shadow
and select ‘lc-dragonfly-1’ preset

9
Copy/Paste your duplicate of ‘lc-bouquet’
Image – Resize at 60% uncheck ‘Resize all layers’
Effects – Image effects – Offset

Effects – Plugins – Alien Skin Eye Candy 5: Impact – Perspective shadow with the same preset as before

10
Image – Add borders – 3 px with Background color
Image – Add borders – 3 px with color white
Image – Add borders – 3 px with Background color

11
With a font of your choice, write ‘Dragonfly Queen’ in whatever choice of colors
that will blend nicely with your image
If you want to use my text, please do, no charge!!
(I used the font Lutin Paniquangoisse – download here, included in the Materials)
With your Move tool, place the text in the left corner as shown in final result To your text, apply an Alien Skin Eye Candy 5: Impact – Perspective shadow with color white

Merge – Merge all (Flatten)

12
Sign and save as a jpg or File – Export – As an optimized jpg file.
We are done!

I hope that you enjoyed making this tutorial and if you send me
your result here, I will gladly post it below!

BACK TO PSP INDEX
BACK TO MY TUTORIALS
BACK TO MY TRANSLATIONS
MY BANNERS

Termi


Paula